Universal Windows Platform
Universal Windows Platform (UWP) provides a common app platform on every device that runs Windows, such as Windows 10+, HoloLens, and more. You can use UWP to build your Unity apps for any Windows device and publish them to the Microsoft Store, without needing to rewrite the app for each platform.
| Topic | Description |
|---|---|
| Introduction to Universal Windows Platform | Understand the key requirements and concepts for UWP. |
| Get started with Universal Windows Platform | Learn about UWP-specific settings and how to set up a project for UWP development. |
| Develop for Universal Windows Platform | Understand UWP-specific development information, such as deep linking, profiler A window that helps you to optimize your game. It shows how much time is spent in the various areas of your game. For example, it can report the percentage of time spent rendering, animating, or in your game logic. More info See in Glossary connection, and more advanced topics. |
| Build and deliver for Universal Windows Platform | Build and deliver your content for UWP. |
Additional resources
- Unity Technologies GitHub: Example UWP Projects
- “Windows Store” platform renamed as “Universal Windows Platform” in Unity 2017.1 NewIn20171
Windows Build Settings
To create a build for Windows, go to Build Settings (menu: File > Build Settings). In the Platform list, select Windows, then select Switch Platform.
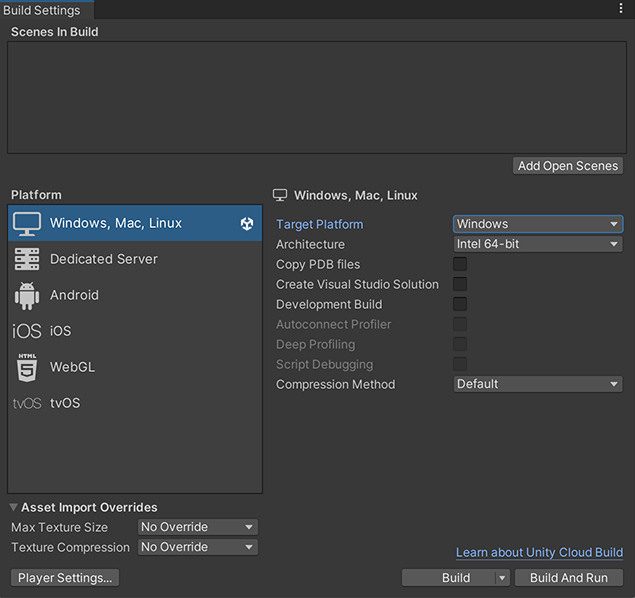
Use these settings to configure how Unity builds your application.
| Setting | Function | |
|---|---|---|
| Target platform | Select Windows to build your app for the Windows platform. | |
| Architecture | Select the CPU to build for (only applies to Build And Run). | |
| Intel 64-bit | Intel/AMD 64-bit CPU architecture. | |
| Intel 32-bit | Intel 32-bit CPU architecture. | |
| Copy PDB files | Enable this setting to include Microsoft program database (PDB) files in the built Windows Player. PDB files contain debugging information for your application, but might increase the size of your Player. For more information, see Windows debugging. | |
| Create Visual Studio Solution | Enable this setting to generate Visual Studio solution files for the project such that you can build the project from Microsoft Visual Studio directly. | |
| Development Build A development build includes debug symbols and enables the Profiler. More info See in Glossary |
Enable this setting to include scripting debug symbols and the Profiler A window that helps you to optimize your game. It shows how much time is spent in the various areas of your game. For example, it can report the percentage of time spent rendering, animating, or in your game logic. More info See in Glossary in your build. When you enable this, Unity sets the DEVELOPMENT_BUILD#define for testing purposes. When you select Development Build, Autoconnect Profiler, Deep Profiling Support, Script Debugging, and Wait for Managed Debugger settings also become available. |
|
| Autoconnect Profiler | Enable this setting to automatically connect the Unity Profiler to your build. | |
| Deep Profiling Support | Enable this setting to select Deep Profiling in the Profiler. This makes the Profiler instrument every function call in your application and returns more detailed profiling data. When you enable Deep Profiling Support, it might slow down script execution. | |
| Script debugging | Enable this setting to allow your script code to be debugged. Not available on WebGL A JavaScript API that renders 2D and 3D graphics in a web browser. The Unity WebGL build option allows Unity to publish content as JavaScript programs which use HTML5 technologies and the WebGL rendering API to run Unity content in a web browser. More info See in Glossary . |
|
| Wait for Managed Debugger | Enable this setting to be prompted to attach a debugger before Unity executes any script code. | |
| Compression A method of storing data that reduces the amount of storage space it requires. See Texture Compression, Animation Compression, Audio Compression, Build Compression. See in Glossary Method (Not available on the WebGL platform) |
Compress the data in your application when you build your application. This includes Assets Any media or data that can be used in your game or project. An asset may come from a file created outside of Unity, such as a 3D Model, an audio file or an image. You can also create some asset types in Unity, such as an Animator Controller, an Audio Mixer or a Render Texture. More info See in Glossary , Scenes A Scene contains the environments and menus of your game. Think of each unique Scene file as a unique level. In each Scene, you place your environments, obstacles, and decorations, essentially designing and building your game in pieces. More info See in Glossary , Player settings, and GI data. Choose from the following methods: |
|
| Default | On Windows, Mac, Linux, and iOS, there is no compression by default. On Android, the default compression is ZIP, which provides better compression results than LZ4HC; however, data is slower to decompress. | |
| LZ4 | A fast compression format that’s useful for development builds. For more information, see BuildOptions.CompressWithLz4. | |
| LZ4HC | A high compression variant of LZ4 that’s slower to build but produces better results for release builds. For more information, see BuildOptions.CompressWithLz4HC. | |
Asset Import Overrides
Use Asset Import Overrides to locally override all texture import settings to speed up import and platform switch time. You must avoid shipping your final build with any import overrides, but you can use this setting during development to speed up iteration time, especially if assets such as low resolution textures are not of any concern.
| Setting | Function |
|---|---|
| Max Texture Size | Override the maximum imported texture size. Unity imports textures in the lower of two values: this value, or the Max Size value specified in Texture import settings. |
This setting also disables the Crunch texture compression format on any textures that have it.
You can also set Asset import override settings using -overrideMaxTextureSize and -overrideTextureCompression Editor Command line arguments to change any initial application import.
Building your Windows application
To build your application, select from one of the following options:

- Build: Compile your application. The default build is incremental, except for the first build, which is always a full non-incremental (clean) build. To force a clean build instead of an incremental build, select Clean Build from the dropdown menu.
- Build and run: Compile your application and open it in your native platform. This option always uses the incremental build.
Windows Player build binaries
When you build a Unity title on the Windows platform, Unity produces the following files, where ProjectName is the name of your application:
- ProjectName.exe — The project executable file, i.e. your project application. This contains the program entry point which calls into the Unity engine when launched.
- UnityPlayer.dll — The DLL file that contains all the native Unity engine code. It’s signed with the Unity Technologies certificate, which lets you verify that no malicious entities have tampered with your engine.
- *.pdb files — Symbol files for debugging. Unity copies these to the build directory if you enable Copy PDB files in the Build Settings window.
- WinPixEventRuntime.dll — This DLL enables Introducing PIX on Windows (beta) support. Unity only creates this file if you enable the Development Build option in the Build Settings window.
- ProjectName_Data folder — This folder contains all the data needed to run your application.
How to rebuild your application
The path to the source code for ProjectName.exe is in the WindowsPlayer folder: Editor\Data\PlaybackEngines\WindowsStandaloneSupport\Source\WindowsPlayer .
To modify your application, or ship the code which you built yourself (if you want to sign it, for example), you must rebuild it and place it in your built game directory.
To build your application outside of Unity, you need Visual Studio 2019 or 2022 with Desktop development with C++ workload installed.
- Windows standalone Player build binaries changed in 2017.2 NewIn20172
- Windows XP support in Standalone Player removed in 2018.1
Выбор версии Unity и подключаемого модуля XR
Хотя мы рекомендуем использовать версии Unity LTS (долгосрочная поддержка) с последней Смешанная реальность подключаемым модулем OpenXR для разработки HoloLens 2 и Windows Mixed Reality, вы также можете создавать приложения с другими конфигурациями Unity.
Unity 2021.3 LTS (рекомендуется)
[!IMPORTANT] > The latest Unity 2021 release has [a known blocking performance bug with HoloLens 2](../../known-issues.md) if the project is using URP rendering pipeline. > > For new projects using URP rendering, we recommend using latest **Unity 2020.3.35f1 or later LTS** with **the latest Mixed Reality OpenXR plugin** to avoid this issue. > > If using other Unity releases, consult the [known active blocking issues](../../known-issues.md#active-blocking-issues) to ensure you avoid builds with other blocking issues. —>
Мы рекомендуем использовать последнюю версию исправления 2021.3 LTS и рекомендуемую версию подключаемых модулей Unity вместе с последней Смешанная реальность подключаемым модулем OpenXR.
Если вы используете более ранний выпуск исправлений Unity, обязательно ознакомьтесь с таблицей известных проблем блокировки , чтобы избежать сборок с другими проблемами блокировки.
Unity 2020 и более поздних версий не поддерживает нацеливание на HoloLens (1-го поколения). Эти гарнитуры по-прежнему поддерживаются в Unity 2019 LTS с устаревшей встроенной архитектурой XR в течение всего жизненного цикла Unity 2019 LTS.
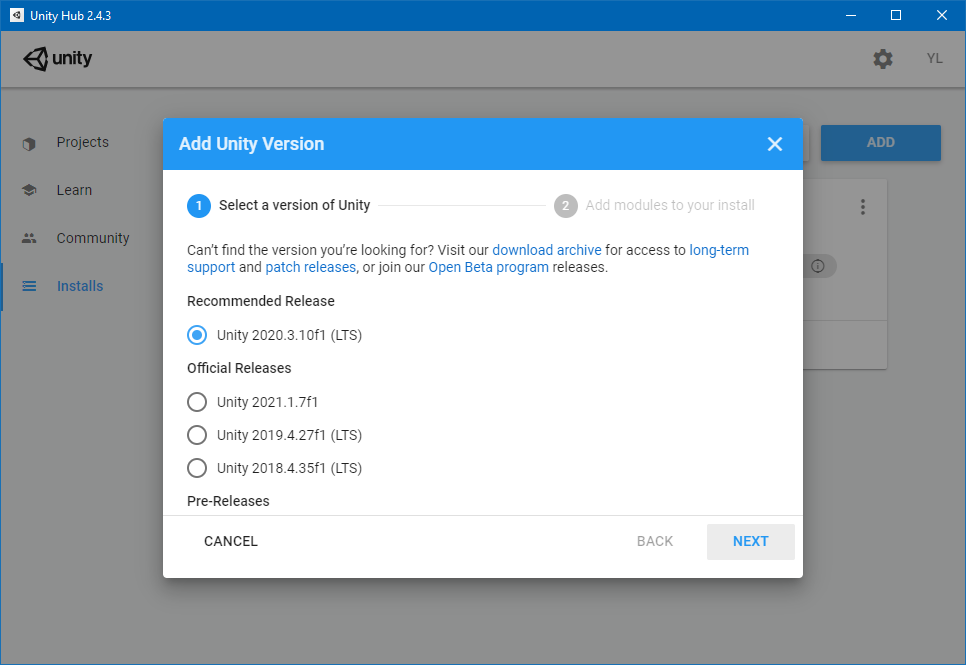
Лучший способ установки Unity и управления ими — с помощью Unity Hub:
- Установите Unity Hub.
- Перейдите на вкладку Установки и нажмите кнопку Добавить.
- Выберите Unity 2021.3 LTS и нажмите кнопку Далее.
- В разделе «Платформы» проверьте следующие компоненты:
- поддержка сборки для универсальной платформы Windows;
- поддержка сборки для Windows (IL2CPP) .
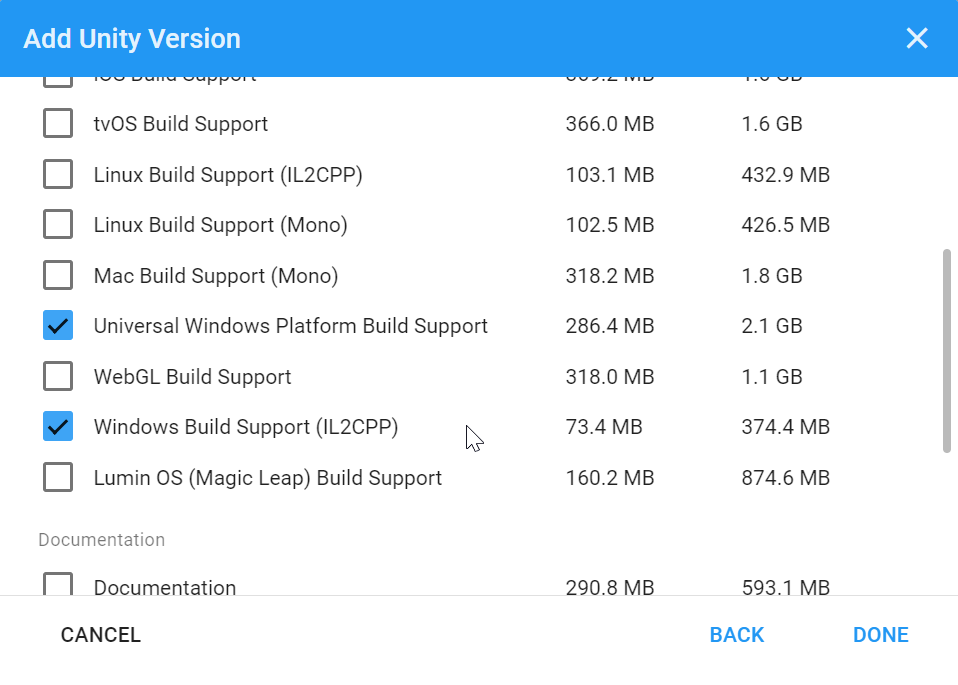
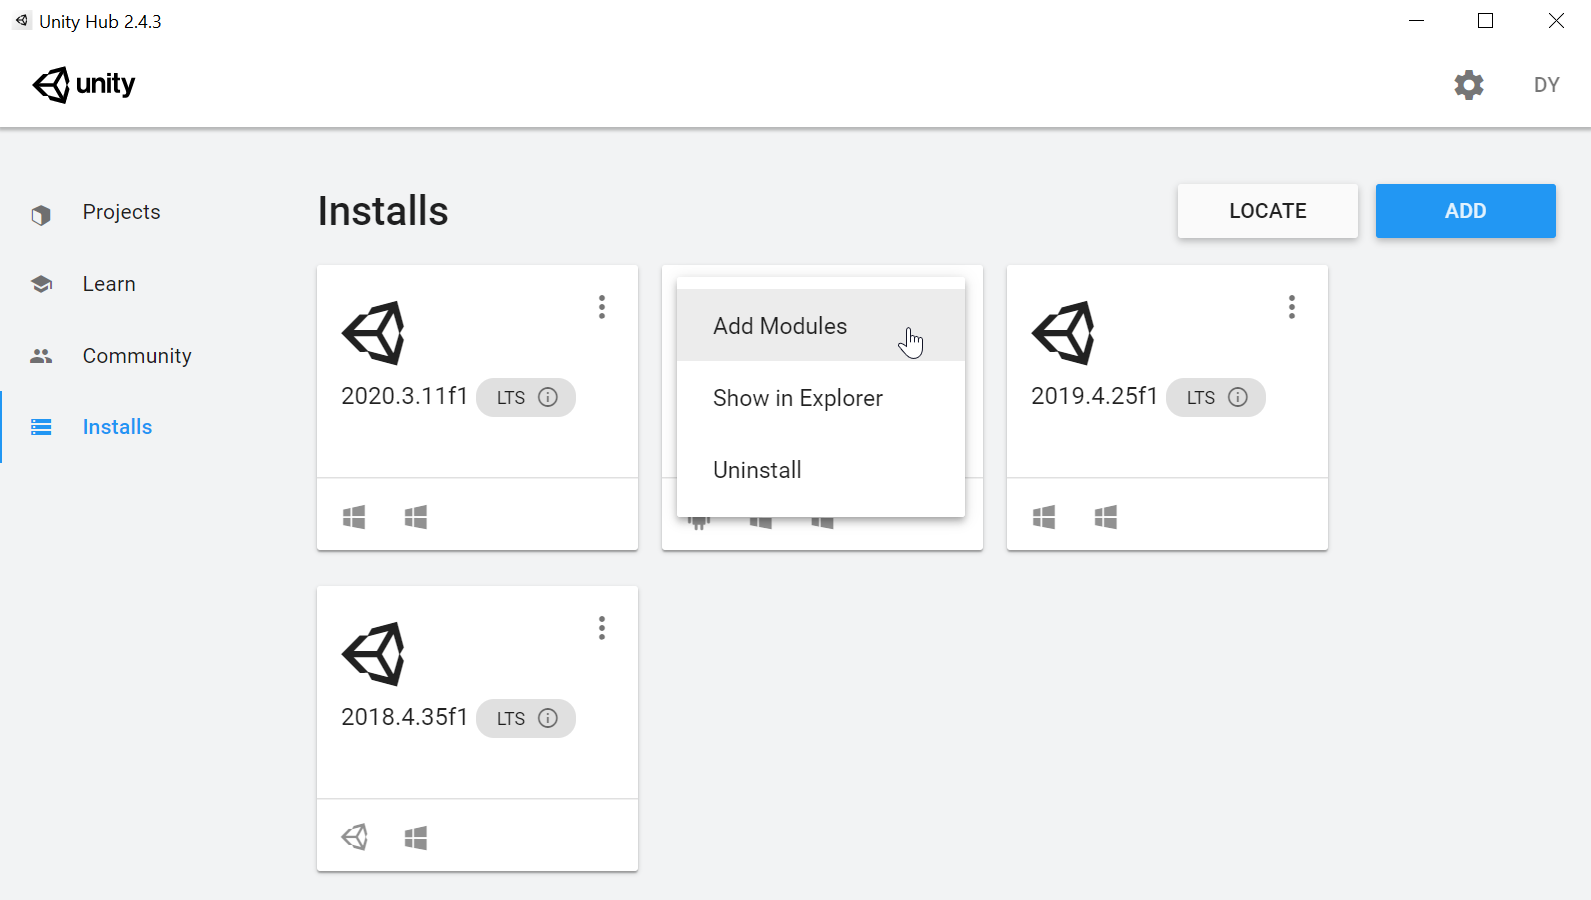
- Если вы ранее установили Unity без этих параметров, их можно добавить в меню «Добавить модули» в Unity Hub:
После установки Unity 2021.3 приступите к созданию проекта или обновлению существующего проекта с помощью подключаемого модуля Смешанная реальность OpenXR:
Unity 2020.3 LTS
Unity 2020.3 LTS достигла конца двухлетнего периода поддержки Long-Term Unity и больше не получает обновления от Unity, хотя ваши проекты будут продолжать работать.
Если вам нужно использовать Unity 2020, можно использовать Unity 2020 LTS с OpenXR.
Хотя мы рекомендуем использовать OpenXR для проектов, Unity 2020.3 также поддерживает подключаемый модуль Windows XR.
Если у вас есть проект Unity 2020, следует рассмотреть возможность планирования миграции на Unity 2021.3 LTS и подключаемый модуль Смешанная реальность OpenXR.
Unity 2019.4 LTS
Unity 2019.4 LTS достигла конца двухлетнего периода поддержки Long-Term Unity и больше не получает обновления от Unity, хотя ваши проекты будут продолжать работать.
Если вам нужно использовать Unity 2019, можно использовать Unity 2019 LTS со встроенной архитектурой XR прежних версий.
С Unity 2019 не рекомендуется использовать встроенную поддержку XR прежних версий. Хотя Unity 2019 предлагает новую платформу подключаемого модуля XR, корпорация Майкрософт в настоящее время не рекомендует этот путь в Unity 2019 из-за несовместимости Пространственных привязок Azure с AR Foundation 2. В Unity 2021 пространственные привязки Azure поддерживаются в платформе подключаемых модулей XR.
Если вы разрабатываете приложения для HoloLens (1-го поколения), эти гарнитуры по-прежнему поддерживаются в Unity 2019 LTS с устаревшей встроенной архитектурой XR в течение всего жизненного цикла Unity 2019 LTS.
Unity 2018.4 LTS
Unity 2018.4 LTS достигла конца двухлетнего периода поддержки Long-Term Unity и больше не получает обновления от Unity, хотя ваши проекты будут продолжать работать.
Если у вас есть проект Unity 2018, следует рассмотреть возможность планирования миграции на Unity 2021.3 LTS и подключаемый модуль Смешанная реальность OpenXR.
Windows build support для unity что такое

Unity Build Server
Масштабируйте локальные ресурсы сборки по запросу или автоматически на выделенном сетевом оборудовании. Используйте плавающие лицензии, чтобы ИТ-специалисты могли развертывать и контролировать инфраструктуру сборки в больших масштабах.
Связаться с нами
Связаться с нами

Масштабирование сборки проектов
Повысьте качество проектов, предоставив сотрудникам возможность быстро и легко создавать сборки в нужном им темпе на выделенном сетевом оборудовании. Это позволит освободить отдельные рабочие станции для более важных задач.

Удобство развертывания и управления
Предоставьте ИТ-администраторам и администраторам лицензии доступ к пулу плавающих лицензий, что позволит осуществлять сборку любому сотруднику в любое время. Улучшайте управление лицензиями и инфраструктурой и освобождайте время ИТ-команды для более важных задач.
Основные преимущества
Гибкость использования лицензий
Плавающие лицензии могут использоваться любым участником команды в любое время. Теперь не нужно тратить время на управление большим пулом именных лицензий.
Меньше простоев
Избегайте затратных и раздражающих простоев, исключив необходимость сборки проекта в рабочем окружении разработчика или на отдельной рабочей станции.
Более высокое качество
Создавая сборки чаще, вы можете скорее выпускать новые версии и быстрее находить проблемы, что позволит создавать более качественные игры и работать эффективнее.
Масштабирование ресурсов сборки
Помогите своим разработчикам быстрее адаптироваться к изменениям в инфраструктуре и команде, чтобы сборки соответствовали потребностям любого проекта в реальном времени.
Значительный рост продуктивности
Освободите ценное время ИТ-специалистов и разработчиков на более важные задачи: им больше не придется возиться с локальными лицензиями и правами для приложения.
Масштабирование и экономия
Благодаря рабочим местам в Build Server вы можете масштабировать ресурсы сборки без значительных затрат. Для этого нужно добавить плавающие лицензии в существующий пул рабочих мест для редакторов.