How to Hide & Unhide Folders on Windows 11 [3 Ways]
Hiding folders is a great way to keep your desktop organized. Maybe you want to keep your personal files or some client details away from prying eyes. Whatever it is, the ability to tuck them away and unhide them when necessary is a big save.
Simply put, these hidden files will not be displayed in the main menu, but they are still accessible. It’s pretty straightforward and shouldn’t take too much of your time.
How do I hide a folder in Windows 11?
1. By using File Explorer
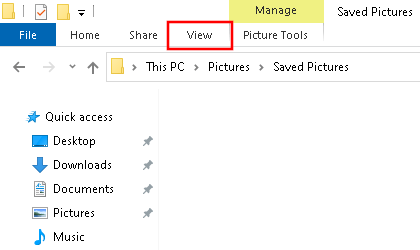
- Hit the Windows + E keys to open File Explorer.
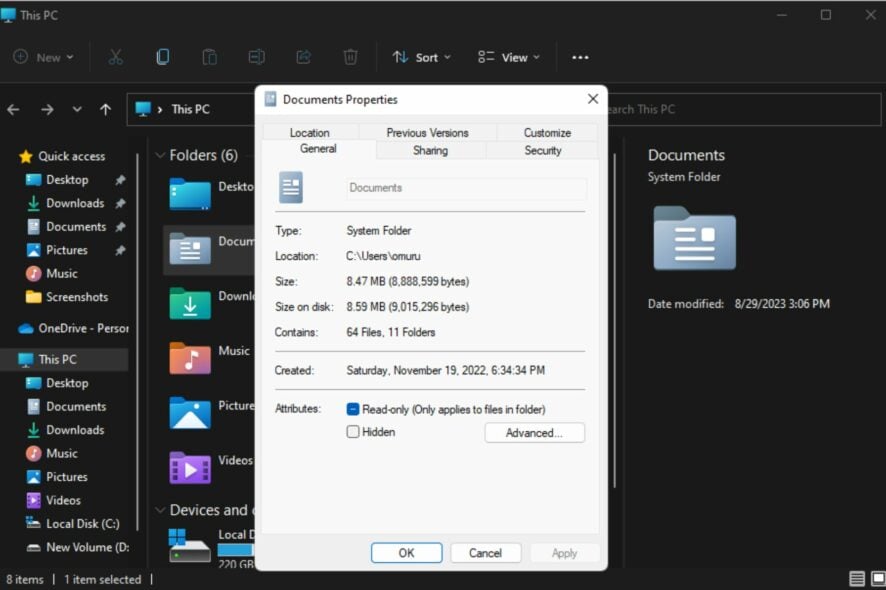
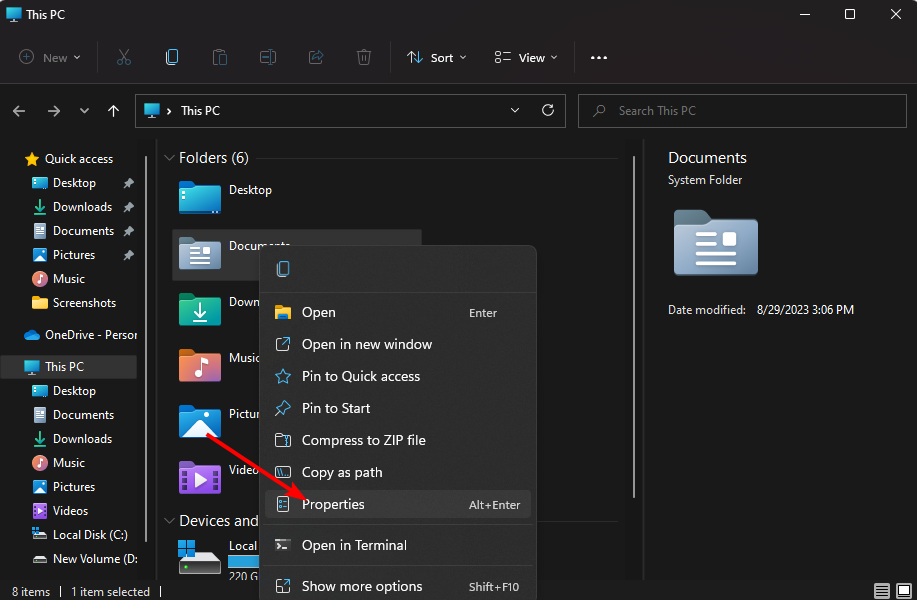
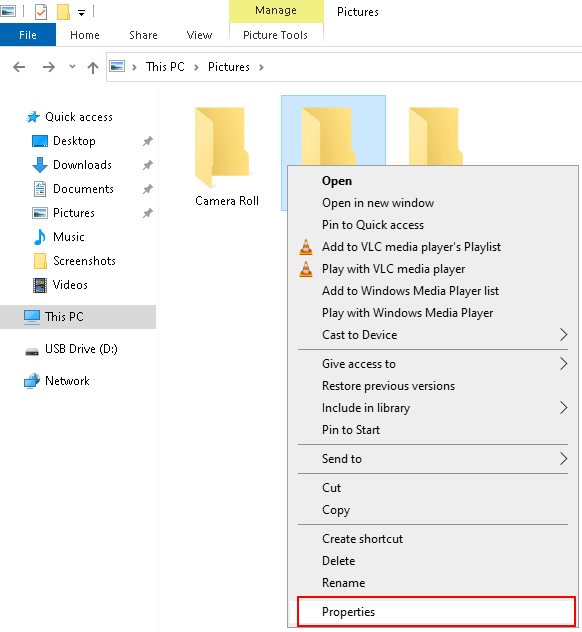
- Locate the folder you wish to hide, right-click on it, and select Properties.
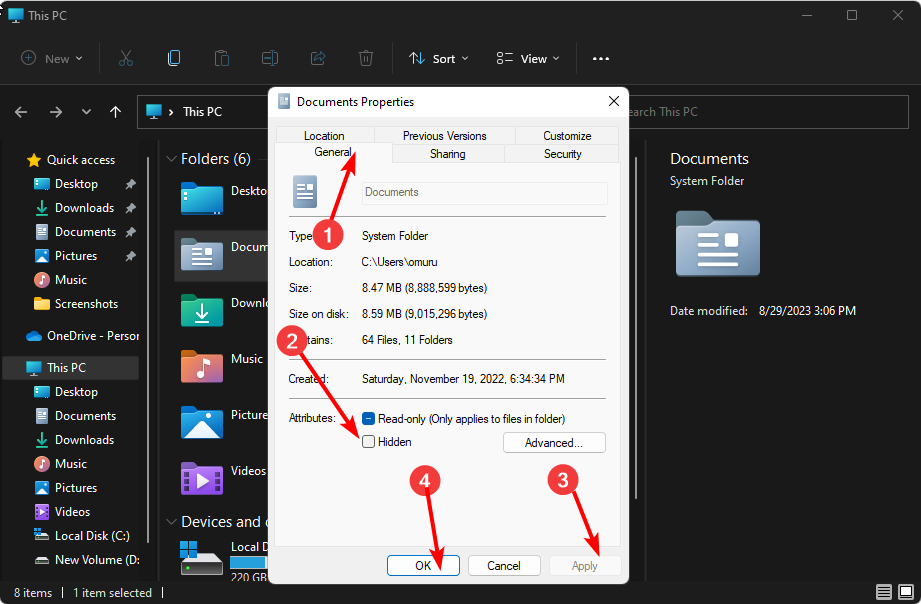
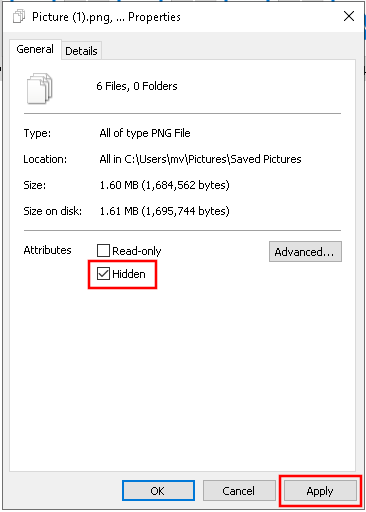
- Navigate to the General tab, check the Hidden box, click Apply, then OK.
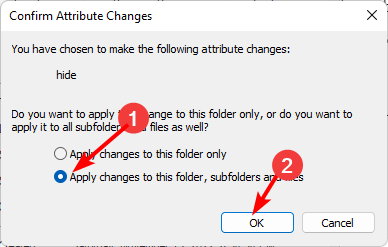
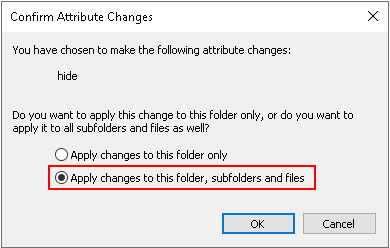
- In the next dialog box, check the Apply changes to this folder, subfolders and files option box, then hit OK.
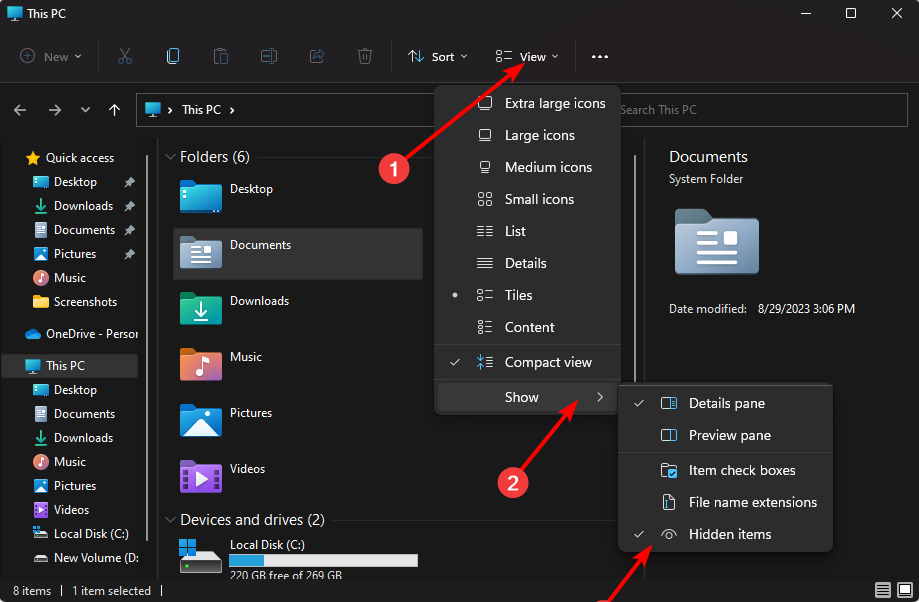
- Go back to File Explorer, click on View>Show>Hidden, and ensure the tick is not there.
2. By using Command Prompt (CMD)
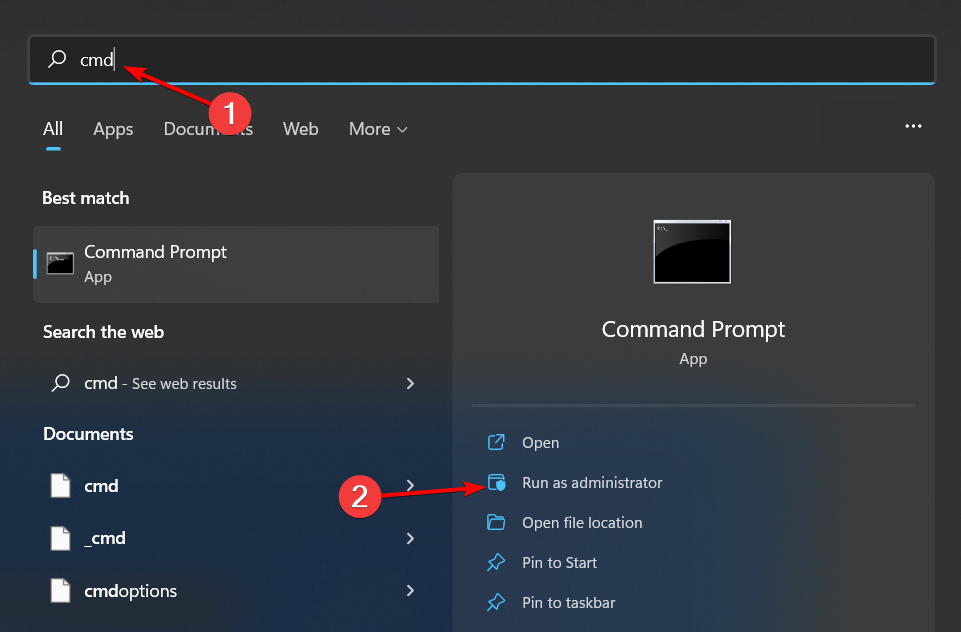
- Hit the Windows key, type cmd in the search bar, and click Run as administrator.
- Type the following command and hit Enter . Remember to replace folder name with the actual name of the folder you wish to hide: attrib +h «folder name»
Read more about this topic
- Microsoft’s latest patent describes a technology capable of hiding parts of the Windows desktop
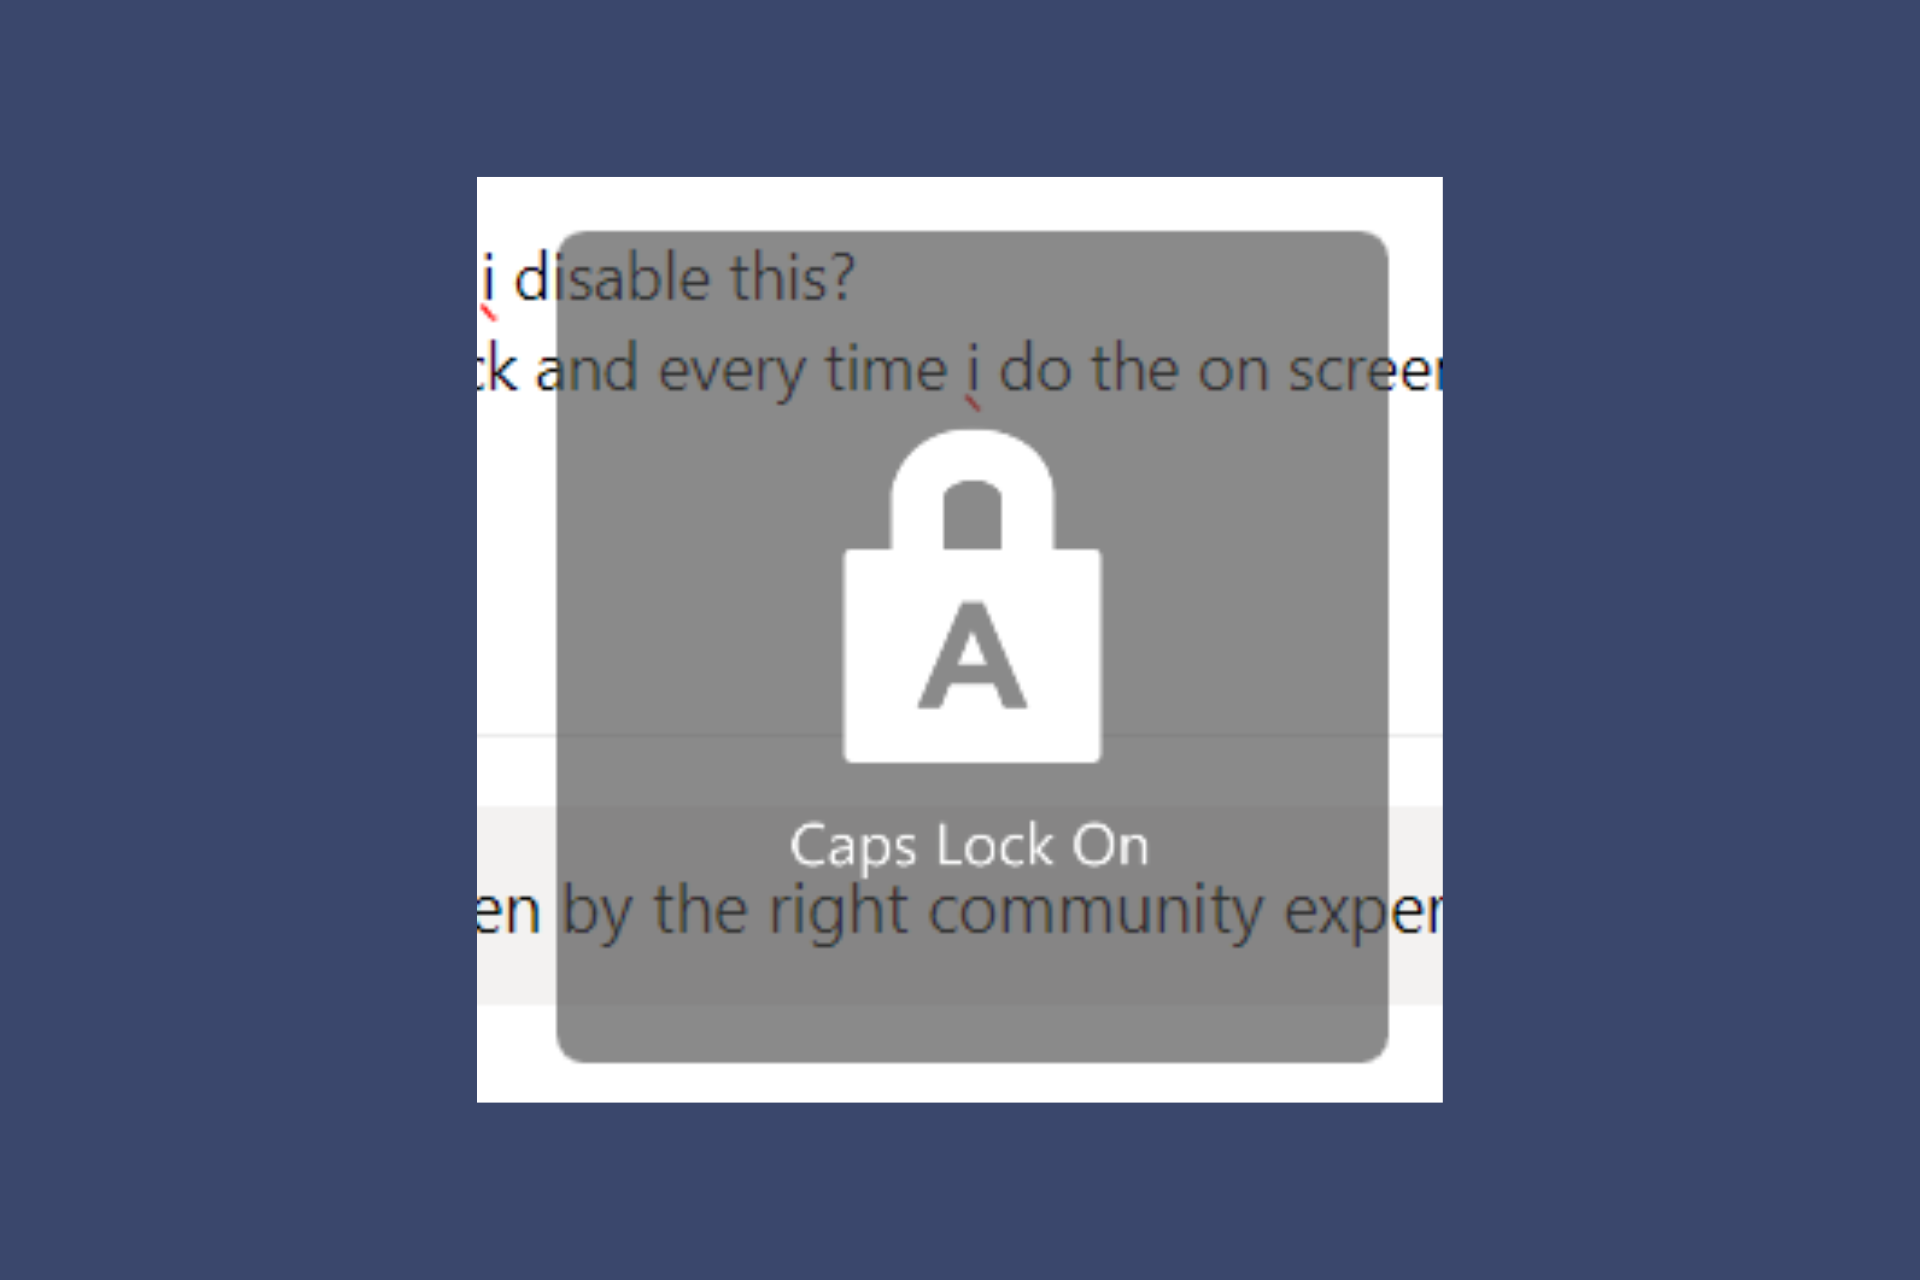
- Windows 11’s Caps Lock notification drives people mad, but there’s a way to turn it off
- Windows 11 will display the date of the latest backup, making it easier to keep track of files
3. By using the PowerShell command
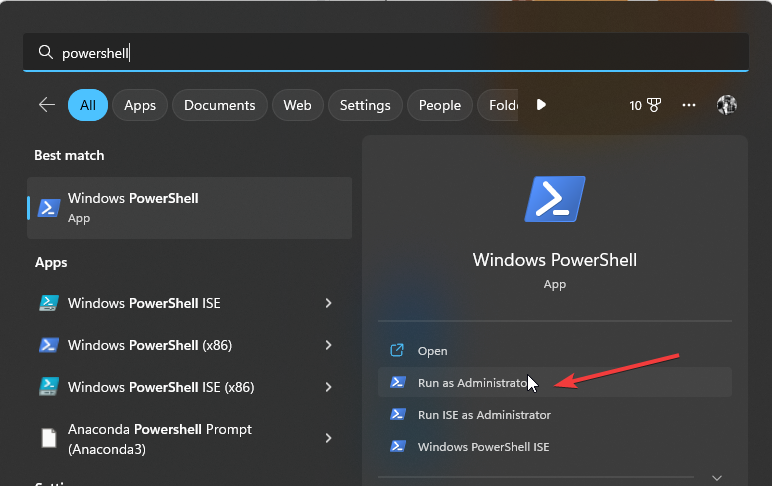
- Click on the Start Menu, type PowerShell in the search bar, and click Run as administrator.
- Type the following command and hit Enter . Remember to replace C:\Users\Folder with the actual path of folder directory you wish to hide: $FILE=Get-Item ”C:\Users\Folder” -Force
- Next, Enter the next command to hide: $FILE.Attributes=”Hidden”
How can I hide a folder in Windows 11 with a password?
While you can use Windows Explorer to hide files in a folder, it’s not a very secure method. Although it makes the folder invisible, if someone has access to your computer, they can easily unhide the folder and access its contents.
Password-protecting your folders is recommended as an extra layer of security. And even with the built-in feature in Windows, it only serves to protect when users log in using other accounts. Anyone who logs in using your user profile can access your hidden items.
This is where the third-party tools come in. Some of the top programs that hide your folders include:
- Wise Folder Hider – This program allows you to hide any folder on your hard disk drive or removable media, such as USB drives, without sacrificing accessibility.
- Folder Lock – This is a feature-rich file security software with online backup and end-to-end data encryption.
- IObit Protected Folder – This is a program that comes with multi-layered security for your sensitive files and other advanced features.
- Gilisoft File Lock Pro – This program comes with a self-protection mode that keeps your folders locked after a period of inactivity.
- Easy Folder Guard – Easy-to-use program with advanced settings like file-disguise to prevent detection.
How do I access a hidden folder on Windows 11?
When you hide folders, they’re no longer visible in Windows Explorer and won’t turn up in search results. Most users do not need to know where these folders are located or how to access them. The folder will be transparent if you’ve enabled the option to see them.
However, if you’ve hidden them from your view in File Explorer, when you want to access the folders you’ve kept away, you will need to show hidden folders.
How do I unhide a folder on Windows 11?
The steps for unhiding folders are similar to hiding, only that you’ll have to reverse-engineer for File Explorer. For the Command Prompt: attrib -h “folder name” is the command to enter, while for PowerShell, it is $FILE.Attributes -match “Hidden”
With these methods, whether you need to get rid of those pesky folders on your desktop or want to secure your files, you can safely keep your folders private without giving away sensitive information while maintaining an intuitive system.
And if you’re looking for more ways to organize your files, we have some folder settings you can try to ensure you get the best user experience possible.
Hopefully, these tips will help you better manage your folder organization on Windows. Are there any other ways you like to hide or unhide folders? Let us know in the comments below.
More about the topics: folder, Windows 11
Claire Moraa
Windows Software Expert
Claire has a knack for solving problems and improving the quality of life for those around her. She’s driven by rationality, curiosity, and simplicity, and always eager to learn more about Microsoft’s products. With a background in teaching and reviewing, she breaks down complex topics into easily understandable articles, focusing mostly on Windows 11, errors, and software.
Claire Moraa
Windows Software Expert
With a background in teaching and reviewing, she breaks down complex topics into easily understandable articles, focusing mostly on Windows 11 errors.
Discover more


Was this page helpful?
Let us know if you managed to solve your tech problem reading this article.
We’re happy to hear that!
You can subscribe to our newsletter to stay up to date with the latest news and best deals!
Do you have a suggestion?
We know how frustrating could be to look for an universal solution.
If you have an error which is not present in the article, or if you know a better solution, please help us to improve this guide.
How to hide files and folders in Windows 10 (+ view & unhide)
Learn how to hide files and folders in Windows 10 from others. And also how to view and unhide hidden files and folders.
Hide files and folders using File Explorer
1. Open File Explorer (Windows Explorer).
2. Go to the file or folder you want to hide.
3. Right-click on the file or folder and then click on Properties.
A “Properties” window will appear.
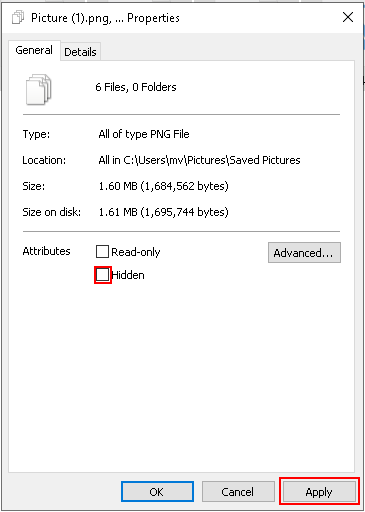
4. Check the box next to the Hidden option.
5. Click on the Apply button in the bottom right corner of the “Properties” window.
If you’re hiding a folder with files and subfolders, then a “Confirm Attribute Changes” window will appear. If you’re not hiding a folder, then you can continue with the last step (8).
6. Make sure that the Apply changes to this folder, subfolders, and files option is selected.
7. Click on the OK button.
8. Click on the OK button to close the “Properties” window.
This is an easy and fast way to hide files and folders, but it’s not a good and secure way. Someone with basic computer knowledge can find the files and folders easily and quickly.
This method is good for hiding files and folders for common users so that they hopefully don’t find and delete or edit the files or folders.
View hidden files and folders using File Explorer
1. Open File Explorer (Windows Explorer).
2. Go to the location of the hidden file or folder.
3. Click on View located in the top menu of File Explorer.
4. Check the box next to the Hidden items option.
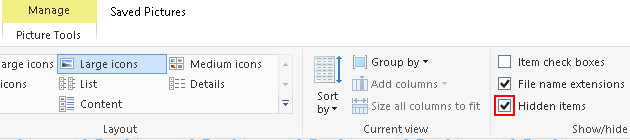
You can now view the hidden file or folder.
Unhide hidden files and folders using File Explorer
1. Open File Explorer (Windows Explorer).
2. Go to the location of the hidden file or folder.
3. Click on View located in the top menu of File Explorer.
4. Check the box next to the Hidden items option.
You can now view the hidden file or folder.
5. Right-click on the file or folder and then click on Properties.
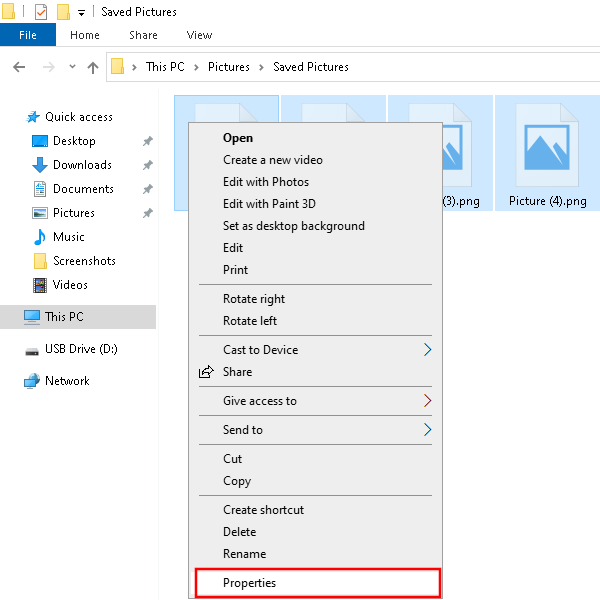
A “Properties” window will appear.
6. Uncheck the box next to the Hidden option.
7. Click on the Apply button in the bottom right corner of the “Properties” window.
If it’s a folder with files and subfolders, then a “Confirm Attribute Changes” window will appear. If it’s not a folder, then you can continue with the last step (10).
8. Make sure that the Apply changes to this folder, subfolders, and files option is selected.
9. Click on the OK button.
10. Click on the OK button to close the “Properties” window.
Hide files and folders using CMD
1. Open Windows Command Prompt.
Two ways to open Command Prompt:
- Type cmd into the search box and then click on Command Prompt when it appears.
- Press the Windows + R key combination, type cmd, and then press the Enter key on your keyboard.
2. Type a command similar to the commands below.
attrib +s +h C:\Users\mv\Documents\"Secret Files"attrib +s +h C:\Users\mv\Pictures\secret-picture.jpgattrib +s +h C:\Users\mv\Videos\"Secret Video.mp4"Replace C:\Users\mv\Documents\»Secret Files», C:\Users\mv\Pictures\secret-picture.jpg, or C:\Users\mv\Videos\»Secret Video.mp4″ with the path to the file or folder you want to hide on your computer.
Note: Quotation marks are only necessary when there are spaces in the name of the file or folder (e.g., Secret Files or Secret Video.mp4).
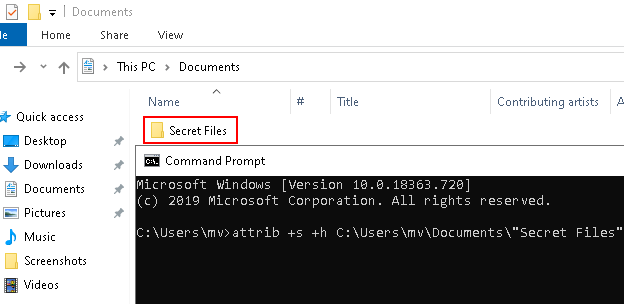
3. Press the Enter key on your keyboard.
The file or folder is now hidden.

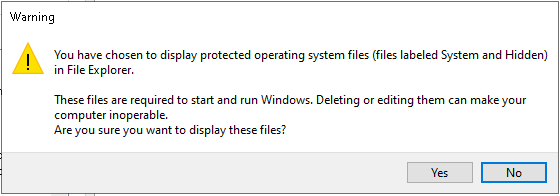
This method is better than the first method because, with this method, Windows won’t show the hidden file or folder even if File Explorer is set to display hidden files and folders.
Someone can still view the hidden files or folders in File Explorer if they click on File (top left) > Change folder and search options > View > uncheck the Hide protected operating system files option.

But this will show a warning message and most people will probably freak out and not click Yes when the message appears.
Make a hidden file or folder visible again using CMD
1. Open Windows Command Prompt.
Two ways to open Command Prompt:
- Type cmd into the search box and then click on Command Prompt when it appears.
- Press the Windows + R key combination, type cmd, and then press the Enter key on your keyboard.
2. Type a command similar to the command you used to hide the file or folder but then replace attrib +s +h with attrib -s -h.
attrib -s -h C:\Users\mv\Documents\"Secret Files"attrib -s -h C:\Users\mv\Pictures\secret-picture.jpgattrib -s -h C:\Users\mv\Videos\"Secret Video.mp4"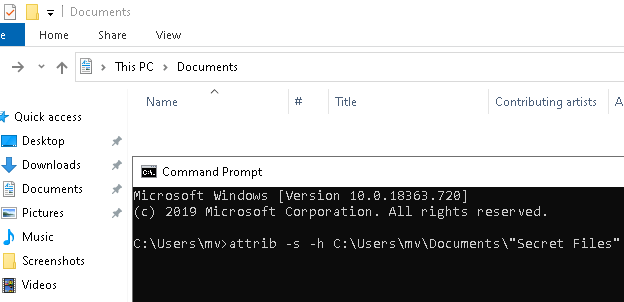
Hide files and folders in audio files using DeepSound
DeepSound is a free program that can hide files and folders in audio files. DeepSound also allows you to easily extract your secret files or folders from audio files.
1. Open DeepSound.
2. Click on Open carrier files.
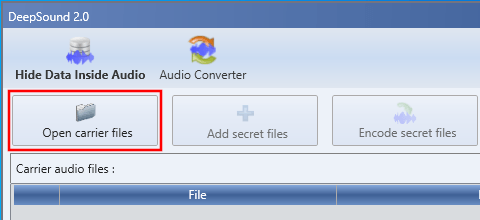
A “Open” window will appear.
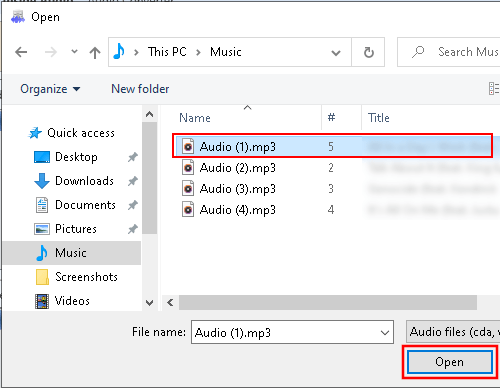
3. Go to the location on your computer where the audio file is stored you want to use to hide your secret data in.
4. Select the audio file.
5. Click on the Open button.
6. Click on Add secret files.
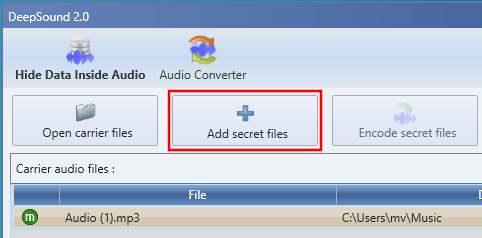
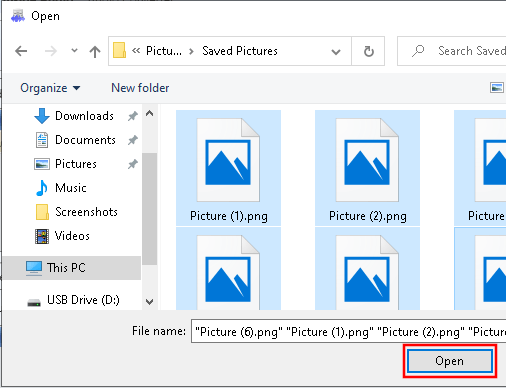
A “Open” window will appear.
7. Go to the location on your computer where the files or folders are that you want to hide.
8. Select the files or folders.
9. Click on the Open button.
At Free space for secret files, you can see how much data (in MB) you can hide in the audio file.
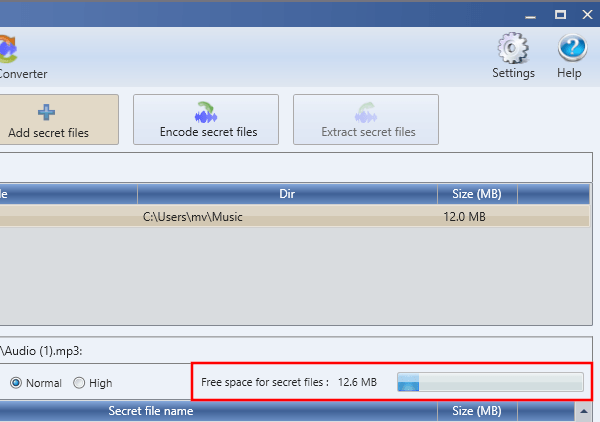
10. When you’re ready, you click on Encode secret files.
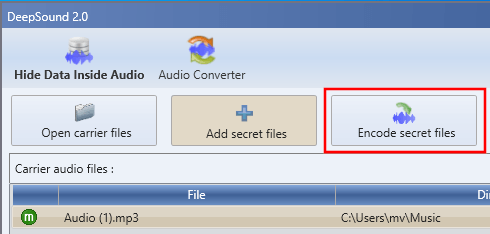
A “Encode secret files” window will appear.
11. At Output format, you can select an audio format.
12. At Output directory, you can see the location on your computer where DeepSound will save the audio file.
13. If you want to hide and protect your files or folder with a password, then check the Encrypt secret files (AES 256) option. If not, then you can skip the following two steps and continue with step 16.
14. Type your password twice.
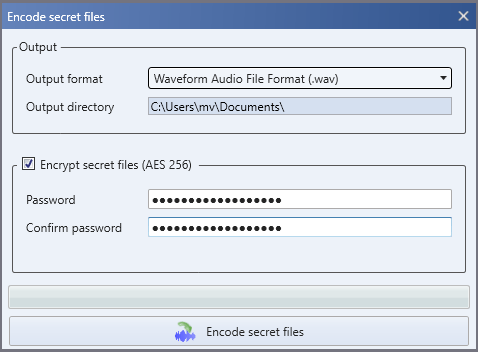
15. Click on Encode secret files button at the bottom of the “Encode secret files” window.
DeepSound will now hide your files or folders in an audio file.
To extract your files or folders from the audio file; click on Open carrier files. Select your audio file and click on Open. Enter your password if asked for and click on OK. Click on Extract secret files.
3 Ways to Unhide Files and Folders in Windows 10
When you are using Microsoft Windows 10 there are certain issues that can really be annoying. One of these points is that Microsoft Windows 10 automatically hides certain files that are usually seen on another OS. So the important files that are available on the drive are not deleted by mistake. Deleting those files might affect the workability of the whole system.
If you are a total nerd person and like playing with important files on the drives, you should know how to unhide folders in Windows 10. So, this article we will talk about how to unhide files and folders in Windows 10.
Unhiding Files and Folders in Windows 10
Are you sure you want to play with hidden files in Windows OS? If your answer is yes, please be with us until the end of the article. We will be featuring 3 methods to unhide files and folders in Windows 10.
Method 1: Unhide Files and Folders in Windows Using File Explorer
One of the easiest methods of unhiding files from Microsoft Windows 10 is by using the explorer.
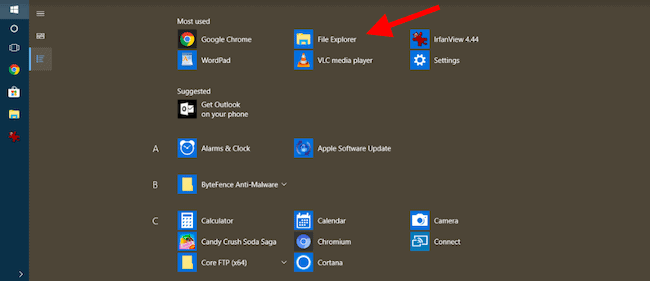
Step 1: Go to the Start button and click on the File Explorer.
Step 2: You will get multiple options from which you need to select the View.
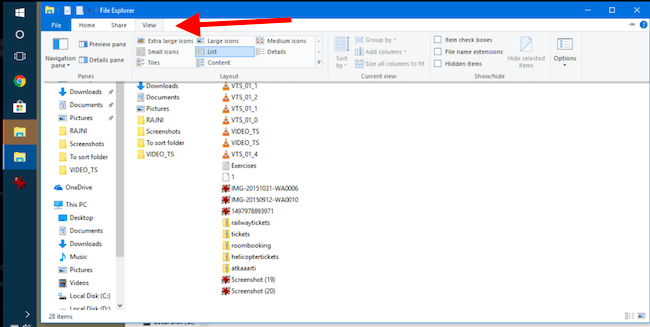
Step 3: You will see the Hidden items checkbox which you need to select to view the hidden files on your Windows 10.
Method 2: Unhide Folders in Windows 10 Using Control Panel
If you aren’t comfortable using the File Explorer option on your computer, you can use the Control panel to show hidden files and folders in Windows 10.
Step 1: Select Control Panel by going to the Start button.
Step 2: Select File Explorer Options from the list and then select the View tab.
Step 3: You will get a huge list of options and scroll down until you see Hidden Files and Folders and then select Show hidden files, folders and drives. This will allow you to see all the hidden files.
There is also an option in the list which states Hide protected operating system files, check this box to make sure you are not playing with system files.
Method 3: Unhide Folders in Windows 10 Using Registry Option
It may take you a little expertise in order to do it via the registry, but here’s an easy process to see hidden files in Windows 10 using registry.
Step 1: In order to bring up the Run dialogue box, you need to hold the Windows and R keys. Once the Run window is up, type “regedit” and hit Enter.
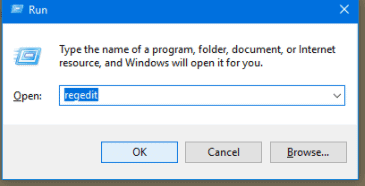
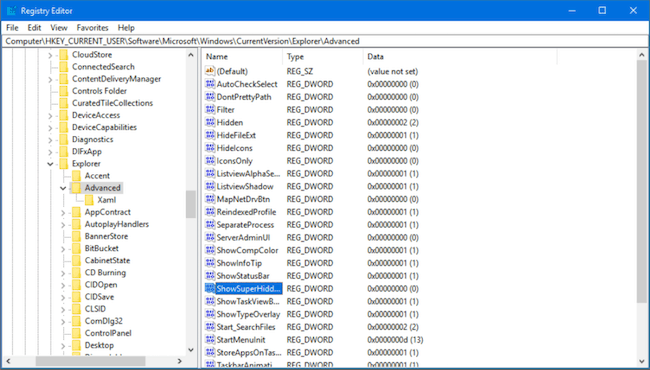
Step 2: Now you need to navigate to the list of locations: HKEY_CURRENT_USER – Software – Microsoft – Windows – CurrentVersion – Explorer – Advanced. Click on Hidden and Right Click and choose Modify and set Value Data to 1 and click OK which will allow you to see the hidden files and folders. If you set the same to 2 it will not show you any kind of hidden folders.
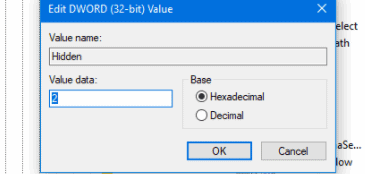
If you want to see the files and folders of the operating system too, you have to set the ShowSuperHidden and turn the value to 1 by right-clicking and choose Modify as you did above. If you don’t wish to see these folders, just change the value to 2.
These are all the methods that will help you to unhide files and folders in Windows 10. If you have any questions following the above tutorial, do let us know in the comments section below.
Spread the word and help us create better tech content
How To Unhide Folders In Windows 10
This Itechguide teaches you how to unhide folders in Windows 10. The guide covers 3 steps to unhide folders in Windows 10.
Step 1: Enable Show Hidden File, Folders, and Drives
The first step to unhide folders in Windows 10 is to enable the Folder Option to view hidden items.
Here are the steps…
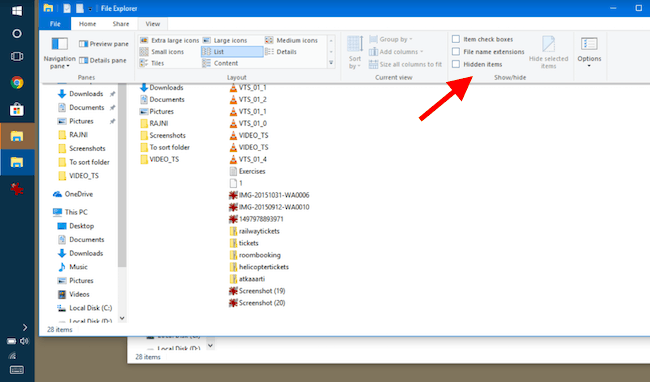
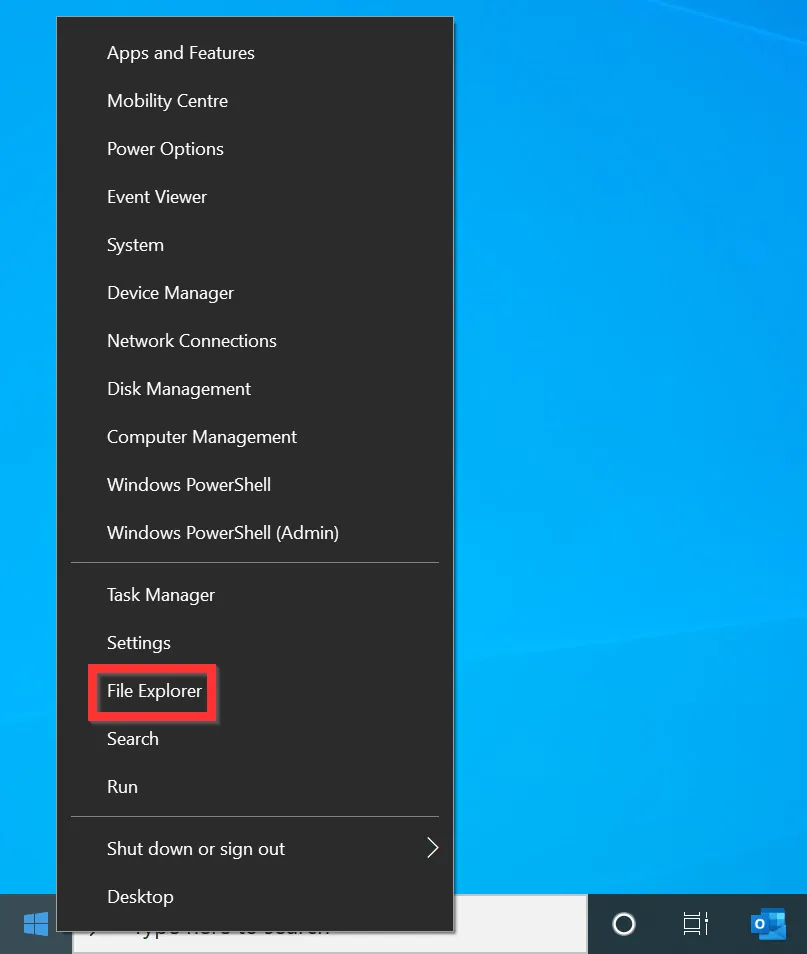
- Right-click the Windows 10 Start menu and click File Explorer.
- Then, on the top menu of File Explorer, click the View tab.
- Finally, to enable show hidden folders, on the Show/Hide category of the View tab, check the Hidden items checkbox.
Step 2: Unhide Folders
Once you have enabled show hidden items, the hidden folder will become visible – use the steps below to remove the Hidden Attribute of the folder.
- Right-click the hidden folder you want to unhide and click Properties.
One way to identify a hidden folder is that the folder icon appears faded.
- On the General tab of the folder Properties, uncheck the Hidden checkbox and click OK.
Step 3: Disable Show Hidden Items
This is the last step – at this stage, your hidden folder is already unhidden but you need to reverse the first step. You ca use the method in step 1 to reverse the setting but I want to show you another method to complete the task…
- Right-click the Windows 10 Start menu and click File Explorer.
- Then, on the top menu of File Explorer, click the View tab.
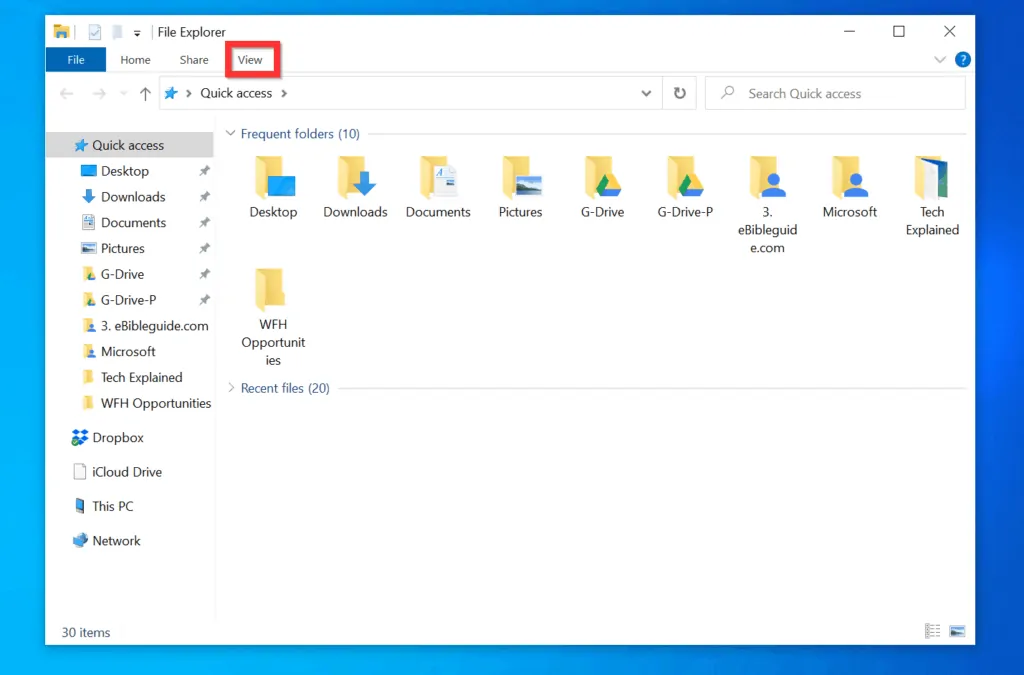
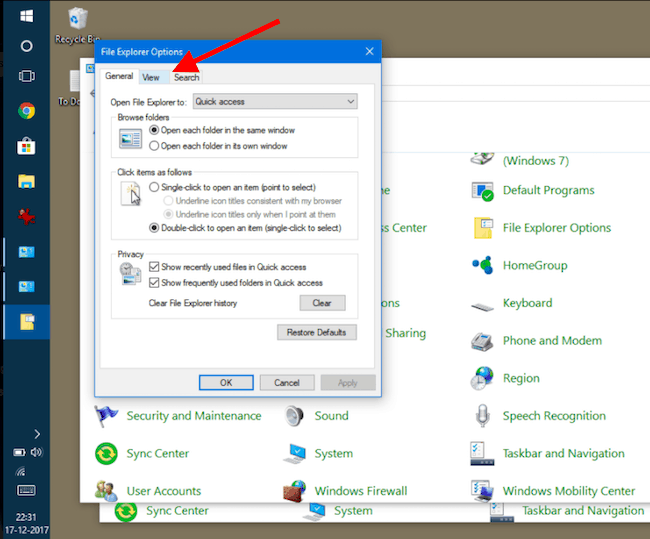
- Then, on the top right of the View tab, click Options. Folder Options will open.
- On the Folder Options window, click the View tab.
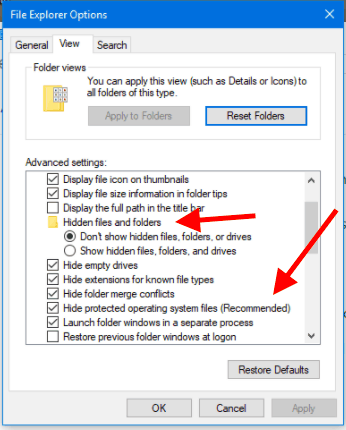
- Finally, below the Advanced settings of Folder Options view tab, locate Hidden files and folders category and select Don’t show hidden files, folders and drives. When you finish, to save your changes, click OK – see the second image below.
I hope you found this Windows 10 Itechguide helpful. If you found this guide helpful, click on “Yes” beside the “Was this page helpful” question below.
You may also express your thoughts and opinions by using the “Leave a Comment” form at the bottom of this page.
Finally, for more Windows 10 Itechguides, visit our Windows 10 How To page
- Was this page helpful?
- Yes (12)No (0)