Построение гистограммы (TeeChart) по данным из таблицы (StringGrid) в Delphi
Как построить столбчатую диаграмму (гистограмму) на данных, взятых из таблицы? Есть динамически формируемая таблица, в которой содержатся некоторые объекты и их свойства (например: наименование, количество, цена и пр.). Задача: взять два столбца из этой таблицы (наименование и цена) и построить гистограмму стоимости для каждого из объектов, где ось X — это наименование объекта, а ось Y — его стоимость. Раньше с компонентом TeeChart дел не имел. Спасибо 🙂
Отслеживать
задан 3 фев 2018 в 23:09
63 2 2 серебряных знака 8 8 бронзовых знаков
1 ответ 1
Сортировка: Сброс на вариант по умолчанию
Не вижу проблем. До сих пор считаю, что интерактивная справка Delphi — лучшая из всех IDE. Да, для TeeChart справки в современном Delphi нет, в отличие от древних версий, но компонент интуитивно понятный для использования. В любом случае, документация к нему доступна на оф. сайте
Итак, чтобы работать с гистограммой, есть два варианта:
- В режиме конструирования формы: добавить Series типа Bar во вкладке Series при настройке компонента TChart
- В runtime-режиме:
var MySeries:TBarSeries; begin MySeries:=TBarSeries.Create(Chart1); chart1.AddSeries(MySeries);
Теперь, чтобы добавлять данные в диаграмму, достаточно обращаться к методу TBarSeries.AddBar(Avalue:double; ALabel:string; Acolor:TColor) . Если нужно при этом брать данные из StringGrid, ничего сложного:
for I := 1 to N do MySeries.AddBar(StrToFloat(StringGrid1.Cells[1,i]),StringGrid1.Cells[0,i], clRed); // предполагаю, что в 1й колонке у вас -цена, в нулевой - наименование. clRed - столбцы будут красного цвета, можете менять clRed на любой желаемый. Tutorial1 — Getting Started
Basic Charts can be built and implemented using the TeeChart Editor with little or no use of code. The TeeChart Editor is two Editors in one, as the Chart may be thought of as being distinct from its data Series contents. You may define the Chart appearance, titles, Legend characteristics and 3D aspect without having to include a data Series. That gives you the freedom to add and remove different data Series types at runtime without having to redefine the whole Chart look and feel.
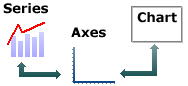
These components work together, with Chart axes being the interface between Chart and Series. A Series has data and its values will influence the label characteristics of the Chart axes. The axes appearance, colours, grid frequency and label fonts may all be defined for the Chart before adding data Series. TeeChart will make a best estimate of most values to minimise the need for you to predefine Chart and Series properties.
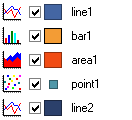
Add multiple series types with the Chart editor: The «Chart distinct from Series» design paradigm of TeeChart allows you to mix a variety of Series types without being limited to a choice of predefined Chart formats.
And Internet ! TeeChart Pro .Net is fully compatible with ASP.NET, being able to be placed on an ASP.NET WebForm and edited at design time in a completely WYSIWYG fashion. You may choose the type of image format outputted at runtime from the list of those available: JPEG, GIF, PNG, TIFF, BMP and EMF. See the Internet applications tutorial for more information.
The steps in this tutorial highlight how easy it is to build a Chart from scratch and will introduce you to the TeeChart Editor to enable you, through later tutorials, to modify and further enhance the appearance and functionality of the Chart. Good Charting !!
Building a Chart
Including TeeChart on a WinForm
By using TeeChart’s installer application you will have succeeded in adding the TeeChart icons to the Toolbox of the Visual Studio .Net programming environment.
The TeeChart Chart icon is a representation of a circled (Pie) Chart.

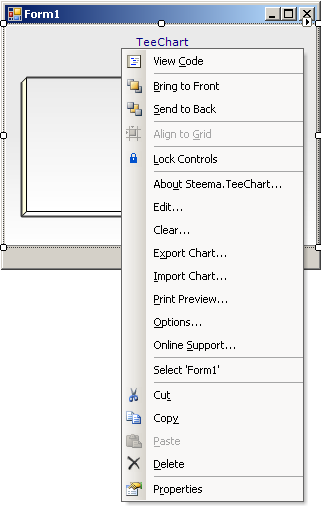
Select the icon in the Toolbar and click and drag out to size TeeChart on a Form. You will see TeeChart as a panel with some basic Chart features such as Axis and Title. TeeChart is much more than a panel of course; right click on the new TeeChart and you will see a menu displayed. Select the Edit. option to access the TeeChart Editor.
For an introduction to TeeChart’s other palette components, follow this link to Tutorial 16.
The TeeChart Editor
The TeeChart Editor contains access to most commonly used, Chart properties.
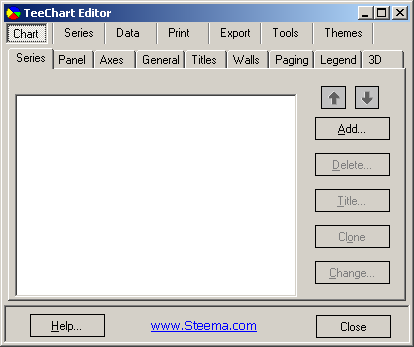
To add a new Series mouseclick on the Add. button and select the Series type from the Series Gallery. If, after selecting a Series type now, you wish to change it later you may do so (with a few exceptions where Series data content may be incompatible) by returning to the first Editor screen and selecting the Change. button.
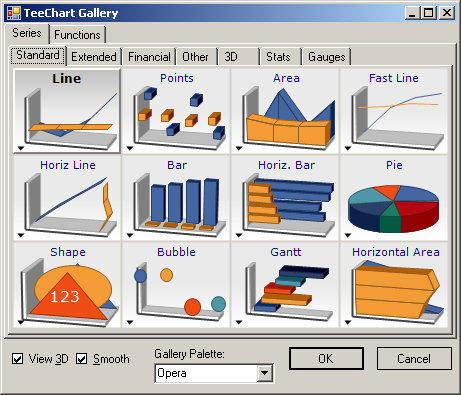
The Chart Series Gallery
The Series Gallery consists of eight tabbed pages:

Standard
Standard Series types, those likely to be called upon most frequently, e.g. Line, Bar, Pie, etc.
Extended
Extended Series types, include more specialized Series types for planning or mapping applications, e.g. Arrow, Polar, Org Charts, Bezier, etc.
Financial
Financial Series include more specialised Financial Series types for financial applications.
Other
If you still haven’t found the Chart type you are looking for, you’re likely to find it here, e.g. Tag Cloud, Wind Rose, Calendar, etc.
3D
3D Series include Series types which offer a 3 dimensional representation e.g. Surface, Waterfall, Tower, etc. These types take three (X, Y, Z) rather than two (X, Y) variables.
Stats
Stats Series include Chart Series types for statistical applications, e.g. Histogram, Error Bar, BoxPlot, etc.
Gauges
Guage Series offer a variety of Guages such as Numerical, Linear, Cirular, etc.
Maps
Map Series include a variety of Maps for geographical Charts e.g. World, Europe, North America, Asia, etc.
Select a Series type. For this exercise we will choose a Bar Series type. The Gallery will close and the new Series will be displayed in the first Chart Editor screen.
Populate the new data Series
Select the Series tab in the Chart Editor to display the Series configuration properties. The fourth tab on the Series page is the the data source tab.
ADO.NET
If your data source is ADO.NET compliant then you may map your data directly in the Chart editor.
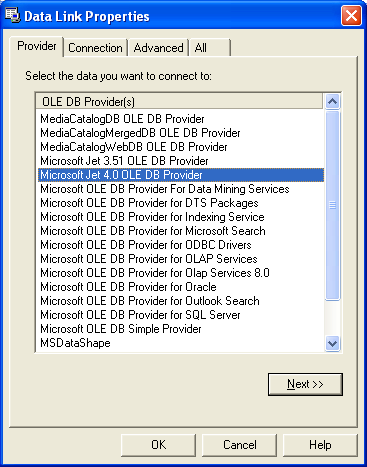
In this example we are going to connect a BarSeries to the TeeChart.mdb Access database. First, from the Data tab of the VS.NET ToolBox, drag a OleDbDataAdapter onto a WinForm with a TeeChart for .Net object on it. Click «Next» on the Data Adapter Configuration Wizard and on the next page click on the «New Connection. » button. Now click on the «Provider» tab of the new window and select «Microsoft Jet OLE DB Provider» as in the image below:
(*please note — the appearance of the Wizard varies slightly between frameworks)
Now click on the «Connection» tab of the same window and select the TeeChart.mdb file from the Sample Data folder under the TeeChart for .Net root directory:
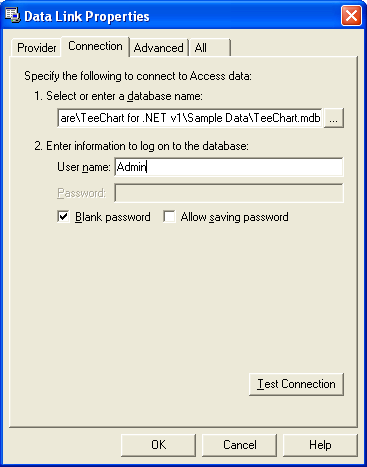
Click on the «Test Connection» button to test the connection and then click on the OK button of the same window. Now click on the «Next» button of the Data Adapter Configuration Wizard window, select «Use SQL Statements» from the window that appears and click on the «Next» button again. Now click on the «Query Builder» button and add in the «Employee» Table. Close the «Add Table» window and select the «*(All Columns)» CheckBox:
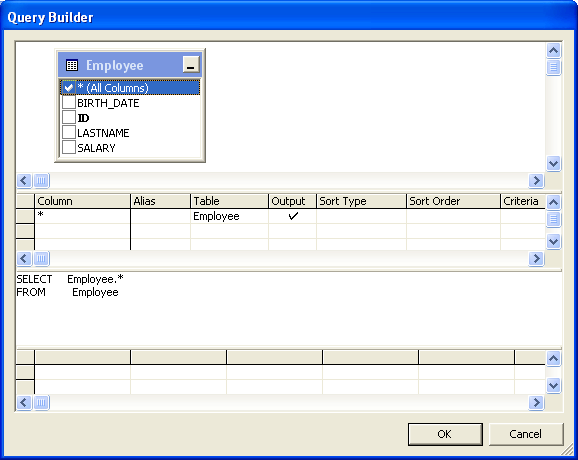
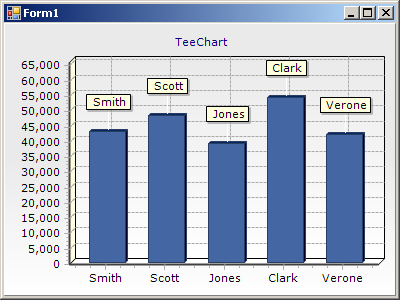
Now OK this window, click on «Next» and then «Finish». Now open the TeeChart Editor, add in a BarSeries and navigate to the DataSource tab of the Series tab. Select «Database» from the ComboBox and oleDbDataAdapter1 [System.Data.OleDb.OleDbDataAdapter] from the DataSet ComboBox. Set Labels to «LASTNAME» and Y to «SALARY» as in the image below:
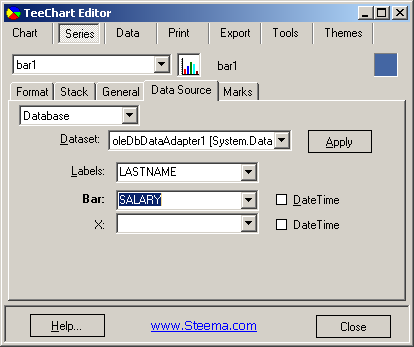
Now click on the Apply button and run the form; you should now have something like the following:
Coded data input
For programmed input of data you will need to write some code. This section will show you the steps necessary to build a chart with coded input.
The Series that you previously added with the Chart Editor shows random data at design time. At runtime however, the Series will be empty of data unless you manually populate it. Select a Button from the Toolbox and place it on your Form. In Visual Studio .Net, double-click on the Button to access the code editor (the approach may vary in different programming environments).
In the code Editor type these lines:
[C#.Net]
private void button1_Click(object sender, System.EventArgs e)
 <
bar1.Add(3,"Pears",Color.Red);
bar1.Add(4,"Apples",Color.Blue);
bar1.Add(2,"Oranges",Color.Green);
>
[VB.Net]
Private Sub Button1_Click(ByVal sender As System.Object, ByVal e As System.EventArgs) Handles Button1.Click
Bar1.Add(3, "Pears", Color.Red)
Bar1.Add(4, "Apples", Color.Blue)
Bar1.Add(2, "Oranges", Color.Green)
End Sub
Run the project and press the Button. Three new bars will appear on your Chart. That’s it!! There’s no more to it.
The first Bar Series in your Chart is called Bar1, the second Bar2 etc.. so with multiple series in your Chart you may use these names to modify the relevant Series.
The Series’ Add method has 25 overloads, the 7th of which accepts 3 variables, Value, Text and Colour. The Add method thus assumes equal spacing of values on the Label axis (in this case the X-Axis). If your data contains 2 variables you may use another of the Add method’s overloads. Add another Button to your project and put this code in it. Run the Project and add points using this code:
[C#.Net]
private void button2_Click(object sender, System.EventArgs e)
 <
Random rnd = new Random();
if(bar1.Count > 0)
 <
//Increment X Axis value and add a new random point
bar1.Add((bar1.XValues.Last + rnd.Next(10)), ((bar1.YValues.Last/(bar1.YValues.Last - 1)) + rnd.Next(10)),"Lemons",Color.Yellow);
>
else
 <
//Add a new random point
bar1.Add(1,rnd.Next(10),"Lemons",Color.Yellow);
>
>

[VB.Net]
Private Sub Button2_Click(ByVal sender As System.Object, ByVal e As System.EventArgs) Handles Button2.Click
Dim rnd As Random
If (Bar1.Count > 0) Then
'Increment X Axis value and add a new random point
Bar1.Add((Bar1.XValues.Last + rnd.Next(10)), ((Bar1.YValues.Last / (Bar1.YValues.Last - 1)) + rnd.Next(10)), "Lemons", Color.Yellow)
Else
'Add a new random point
Bar1.Add(1, rnd.Next(10), "Lemons", Color.Yellow)
End If
End Sub
Selecting a Series type to suit your needs
The last coded example generated new X and Y values. The X axis distance between points is not constant which will cause overlapping of Bars in some cases, which would be desirable for some but not all applications. Using the Chart Editor to Change the Series type (Enter the Chart Editor at Design time and use the Change button on the first page, then change all references to Bar1 in your code to Line1) to a LineSeries shows an alternative way to graphically represent data with 2 variables.
If your data contains more than 2 variables there are other Series Types suited to displaying the data. Have a look at the Chart Gallery to select the Series type you think might serve you best then read about it in the TeeChart help.

© 2002- Steema Software SL. All rights reserved.
Как привязать subaxis в teechart к данным
Axis scales are set automatically when you add Series data to your Chart. You may change from the defaults at design time or at runtime by using Axis properties.
Automatic selects the best axis scale range to fit your data. If you turn Automatic off the Scales section will activate options and you can change Axis values. Important, remember to select the Axis that you wish to configure from the Axis menu on the left of the page.
Add a Line Series to a Chart add a Command Button with the following code:
procedure TForm1.BitBtn1Click(Sender: TObject); var t: Integer; begin For t := 0 To 40 do With Series1 do begin Add(Int(Random(t)), '', clRed); end; end;
Running the code in the button will draw a Line Series with 40 random values.
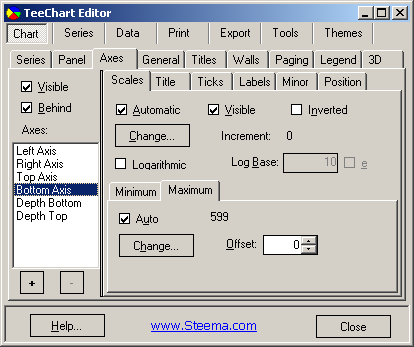
Go to the Chart Editor at design time. Turn Automatic ‘off’ in the Bottom Axis scales section of the Axis page. You may now configure Maximum and minimum values for the Axis scale. Running the code again will show values depending on the values you configured for the Axis. Using the right mouse button you may scroll to see the remaining values.
Setting axis scales by code
You can change the Maximum and Minimum at runtime using this code:
With Chart1.Axes.Bottom do begin Automatic := False; Maximum := 36; Minimum ;= 5; end;
You may set Axis scale Maximum and Minimum to automatic individually. eg:
With Chart1.Axes.Bottom do begin AutomaticMaximum := True; Minimum := 5; end;
Increment
You may tailor the intervals for the Axis. Select the Desired Increment combobox from the Scales section of the Axis page and add the increment you require. You may change this by code at runtime:
Chart1.Axes.Bottom.Increment := 20;
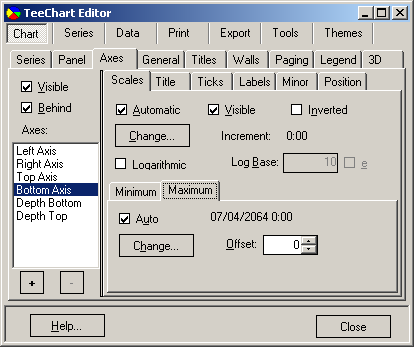
Datetime data
If your data is datetime (You may set the data to datetime for your Series by going to the Series, General page), the Chart, Axis page and scales section will show a datetime range. Select the from the range shown in the Desired Increment combobox.
add some sample data
for t := 1 To 25 do Series1.AddXY(EncodeDate(1998, 4, t), Random(t), '', clRed);
Change the Increment at runtime:
Chart1.Axes.Bottom.Increment := DateTimeStep[dtOneWeek];
See the Axis.ExactDateTime property for more information about date axis labelling.
When changing axis label frequency, bear in mind that TeeChart will avoid label overlap according to the setting of the LabelsSeparation property. This means that if the label frequency is too high for the labels to fit, then TeeChart will allocate ‘best fit’. Changing the label angle and label separation are 2 options that may help you fit the labels you require. See the Labels section and LabelsAngle property.
Titles
Titles are set in the Titles section of the Axis page. You may change the Title text for the Axis and its font. The angle may be selected from values 0, 90, 180, 270 degrees. For runtime see the TChartAxisTitle Component.
Labels
When changing axis label frequency, bear in mind that TeeChart will avoid label overlap according to the setting of the LabelsSeparation property. This means that if the label frequency is too high for the labels to fit, then TeeChart will allocate a ‘best fit’. Changing the label angle and label separation are 2 options that may help you fit the labels you require. See the Labels section and the LabelsAngle property.
Label formats
You may apply all standard number and date formats to Axis labels. The Axis page, Labels section contains the field «Values format». If your data is datetime the field name changes to «Date time format». In the Editor drag the help «?» icon onto the field to get a full listing of options. at runtime use:
Chart1.Axes.Bottom.AxisValuesFormat := '#,##0.00;(#,##0.00)'; //or for Datetime data Chart1.Axes.Bottom.DateTimeFormat := 'dd/mmm/yy hh:mm:ss';
MultiLine labels
Axis labels can be displayed as multi-line text instead of a single line of text. Lines are separated using the TeeLineSeparator global constant, which by default is the carriage-return ascii character ( #13 ).
//Add the Series labels in this way and apply 'Marks' as Axis labelling style Series1.Add( 1234, 'New'+TeeLineSeparator+'cars' , clRed ); Series1.Add( 2000, 'Old'+TeeLineSeparator+'bicycles' , clBlue );
Example for DateTime labels:
The following will show the Bottom Axis labels in two lines of text, one showing the month and day, and the second line showing the year:
Feb-28 Mar-1 .. 1998 1998 ..
Series1.AddXY( EncodeDate( 1998,2,28 ), 100 ); Series1.AddXY( EncodeDate( 1998,3,1 ), 200 ); Series1.AddXY( EncodeDate( 1998,3,2 ), 150 ); Series1.XValues.DateTime := True; Chart1.Axes.Bottom.DateTimeFormat := ‘mm/dd hh:mm’;
If you set the LabelsMultiLine property to True, the axis will automatically split labels into separate lines where spaces are found.
Chart1.Axes.Bottom.LabelsMultiLine:=True;
Dividing the Label into two:
‘mm/dd’ for the first line
‘hh:mm’ for the second line
At run-time you can always split the label into lines programmatically, using the OnGetAxisLabel event:
procedure TForm1.Chart1GetAxisLabel(Sender: TChartAxis; Series: TChartSeries; ValueIndex: Integer; var LabelText: String); var s:string; begin s:='abc'+TeeLineSeparator+'def'; LabelText:=ReplaceChar(s,' ',TeeLineSeparator); end;
The axis LabelsAngle property ( label rotation in degree angles 0, 90, 180 or 270 ), can also be used with multi-line axis labels.
Customising Axis labels
Further Label control may be obtained by using Axis events. The events permit you to activate/deactivate/change any individual Axis label. The following example modifies each Label, putting a textual phrase in front of the point index value.
//set LabelStyle to 'Mark' with the TChart editor or use:- Chart1.Axes.Bottom.LabelsStyle := talMark; //OnGetaxisLabel event procedure TForm1.Chart1GetAxisLabel(Sender: TChartAxis; Series: TChartSeries; ValueIndex: Integer; var LabelText: String); begin if Sender = Chart1.Axes.Bottom then LabelText := 'Period ' + IntToStr(ValueIndex); end;
See the section entitled Axis events for more information about customising labels with Axis events.
Ticks
There are 3 tick types. You can change the length, width and colour of each tick type. If the tick width is set to 1 (default) then you may change the style to one of several line types (dot, dash, etc.). Style will be ignored if width is greater than 1.
With Chart1.Axes.Bottom do Begin TickLength := 7; Ticks.Color := clGreen; MinorTickCount := 10; //change number of minorticks between (major) Ticks end;
Axis position
Axes have a property which modifies where each axis is to be located. In this example, the axis is moved to 50% of the total Chart width, so it is shown at the chart center:
Chart1.Axes.Left.PositionPercent := 50 ;
Additional Axes
Copying axes
TeeChart offers 5 axes to be associated with data Series: Left, Top, Bottom, Right and Depth. When you add a new series to a Chart you may define to which of the axes the Series should be related (Go to the Series tab, General page). You may repeat any one (or all) of the 4 front axes at any place on the Chart by using the Axis Customdraw method. Note that this method makes a copy of your Axis, it does not add a new Custom Axis. See the next section, Multiple Custom Axes, for more information.
You will find this example, called «CustAxisProject1», with the TeeChart sample code:
//fill the Series for this example with random data procedure TForm1.BitBtn1Click(Sender: TObject); Var t:integer; begin For t := 0 To 20 do Series1.AddXY(t, Random(100) - Random(70), '', clRed); end; //Put this code in the OnBeforeDrawValues() event: procedure TForm1.Series1BeforeDrawValues(Sender: TObject); var posaxis :Integer; begin With Chart1 do begin If Axes.Left.Maximum > 0 Then begin //When scrolling or on zoom always keep the gridlines enclosed in the Chart rectangle Canvas.ClipRectangle(ChartRect); //Always draw the 2nd vertical Axis at the middle point of the Chart posaxis := (ChartRect.Left) + (ChartRect.Right - ChartRect.Left) div 2; Axes.Left.CustomDraw(posaxis - 10, posaxis - 20, posaxis, True); //Draw the 2nd Horizontal axis at the level of "10" on the vertical axis posaxis := (Axes.Left.CalcYPosValue(10)); Axes.Bottom.CustomDraw(posaxis + 10, posaxis + 40, posaxis, True); Canvas.UnClipRectangle; end; end; end;
| Custom axes |
In this example, TeeChart will plot the New axes, one horizontal and one vertical in the centre of your Chart. When you scroll the Chart (dragging with right mouse button), the new vertical axis will always remain central to the Chart, the new horizontal axis will move up and down with vertical scrolling. The new axes are exact copies of the default axes.
Multiple Custom Axes
Together with the PositionPercent and stretching properties, it�s possible to have unlimited axes floating anywhere on the chart. Scroll , zoom , and axis hit-detection also apply to custom-created axes. Creating extra axes is now possible both at designtime via the Chart Editor and at runtime via a few lines of code:
Via the Chart Editor
TeeChart offers you the ability to create custom axes at designtime enabling them to be saved in TeeChart’s tee file format. To achieve this, open the Chart Editor and click on the Axis tab and then select the «+» button to add a Custom Axis. Then select the Position tab making sure you have your new Custom Axis highlighted. The Horizontal checkbox on this page allows you to define your new Custom Axis as an horizontal axis or to leave it as the default vertical axis. The rest of this page and the other tabs in the Axis page can be used to change the Scales, Increment, Titles, Labels, Ticks, Minor Ticks and Position of the Custom Axis as explained above. To associate this new Custom Axis with the Data Series you desire select the Series tab and go to the General page where the dropdown Comboboxes ‘Horizontal Axis’ and ‘Vertical Axis’ will enable you to select your new Custom Axis depending on whether you previously defined it as vertical or horizontal.
procedure TForm1.BitBtn2Click(Sender: TObject); Var MyAxis : TChartAxis ; begin MyAxis := TChartAxis.Create( Chart1 ); Series2.CustomVertAxis := MyAxis; //You can modify any property of the new created axes, such as the axis color or axis title With MyAxis do begin Axis.Color:=clGreen ; Title.Caption := 'Extra axis' ; Title.Font.Style:=[fsBold]; Title.Angle := 90; PositionPercent := 20; //percentage of Chart rectangle end; end;
You are able to then position the new Axis in overall relation to the Chart by using the StartPosition and EndPosition properties.
StartPosition:=50; EndPosition:=100;
These figures are expressed as percentages of the Chart Rectangle with 0 (zero) (in the case of a vertical Axis) being Top. These properties can be applied to the Standard Axes to create completely partitioned ‘SubCharts’ within the Chart.
With Chart1.Axes.Left do begin StartPosition:=0; EndPosition:=50; Title.Caption:='1st Left Axis'; Title.Font.Style:=[fsBold]; end;
The above 2 coded examples when combined with the following data:
var t: integer; begin for t := 0 to 10 do begin Series1.AddXY(t,10+t,'',clTeeColor); if t > 1 then Series2.AddXY(t,t/2,'',clTeeColor); end;
. will show the following Chart:
| Multiple axes |
Another technique for adding Custom Axes would be the following which uses the Axis List as the focal point by using the List Add then by accessing the Axis by Index:
//Add data to Series: procedure TForm1.FormCreate(Sender: TObject); begin Series1.FillSampleValues(10); Series2.FillSampleValues(10); end; procedure TForm1.BitBtn1Click(Sender: TObject); var tmpVertAxis: TChartAxis; tmpHorizAxis: TChartAxis; begin Chart1.CustomAxes.Add; tmpVertAxis:=Chart1.CustomAxes[0]; tmpVertAxis.PositionPercent:=50; Series1.CustomVertAxis:=tmpVertAxis; Chart1.CustomAxes.Add; tmpHorizAxis:=Chart1.CustomAxes[1]; tmpHorizAxis.Horizontal:=True; tmpHorizAxis.Axis.Color:=clGreen; tmpHorizAxis.PositionPercent:=50; Series1.CustomHorizAxis:=tmpHorizAxis; end;
Options are limitless! We advise caution when using Custom Axes as it is easy to start filling the screen with new axes and to lose track of which one you wish to manage !
Axis events
Axis events offer runtime flexibility to modify Axis Labels and offer interactivity to the user on Axis Clicks.
OnClickAxis
procedure TForm1.Chart1ClickAxis(Sender: TCustomChart; Axis: TChartAxis; Button: TMouseButton; Shift: TShiftState; X, Y: Integer); begin //Shows Axis point clicked when click on Bottom Axis. if Axis = Chart1.Axes.Bottom Then ShowMessage('Clicked Bottom Axis at ' + FloatToStr(Chart1.Axes.Bottom.CalcPosPoint(X))); end;
OnGetAxisLabel
Can be used to modify Axis Labels. See the OnGetAxisLabel event.
procedure TForm1.Chart1GetAxisLabel(Sender: TChartAxis; Series: TChartSeries; ValueIndex: Integer; var LabelText: String); begin if Sender = Chart1.Axes.Bottom Then Case StrToInt(FormatDateTime('mm', StrToDate(LabelText))) of 1,2,3 : LabelText := '1st Qtr'; 4,5,6 : LabelText := '2nd Qtr'; end; end;
OnGetNextAxisLabel
Can be used to decide which Axis Labels should be displayed. See the OnGetNextAxisLabel event. You should use the Stop Boolean property to include/exclude Axis Labels.
procedure TForm1.Chart1GetNextAxisLabel(Sender: TChartAxis; LabelIndex: Integer; var LabelValue: Double; var Stop: Boolean); begin Stop:=False; if Sender = Chart1.Axes.Bottom Then begin if LabelValue>=5 then LabelValue:=LabelValue+5 else LabelValue:=5; end else Stop:=True; end;
The above example will start labelling at ‘5’ on the Bottom Axis labelling every 5 points. Other Axes’ Labels are unaffected.
Tutorial4 — Axis Control
TeeChart Pro will automatically define all Axis labelling for you and offers plenty of flexibility to tailor any specific requirements you may have. TeeChart Pro offers true Multiple Axes. These are available at design or run time and offer countless possibilities and flexibility for Axis definition. See the section in this tutorial for more information.
Contents
Axes control — Key areas
Scales
Axis scales are set automatically when you add Series data to your Chart. You may change from the defaults at design time or at runtime by using Axis properties.
Non date-time data
When adding a new Series, the Scales section of the Axis Page of the TeeChart Editor will show Automatic selected and other options greyed out. All values shown are numeric.
Date-time data
When a Series has datetime set to true (for that axis) on the Series -> General page, the Scales section of the Axis Page of the TeeChart Editor will show Automatic selected and other options greyed out. Values are shown with Date-time values.
Automatic selects the best axis scale range to fit your data. If you turn Automatic off the scales section will ungrey options and you can change Axis values. Important, remember to select the Axis that you wish to configure from the list of Axes on the left of the page.
Add a Line Series to a Chart using the TeeChart Editor at design-time then add a Command Button with the following code:
[C#.Net]
Random rnd = new Random();
for(int i = 0; i line1.Add(Convert.ToDouble(i),rnd.Next(100),Color.Red);

[VB.Net]
Dim i As Integer
For i = 0 To 40
Line1.Add(Convert.ToDouble(i), Rnd() * 100, Color.Red)
Next i
Running the code in the button will draw a Line Series with 40 random values. Go to the TeeChart Editor at design time. Turn Automatic ‘off’ in the Bottom Axis scales section of the Axis page. You may now configure Maximum and minimum values for the Axis scale. Running the code again will show values depending on the values you configured for the Axis. Using the right button of the mouse you may scroll to see the remaining values.
Setting axis scales by code
You can change the Maximum and Minimum at runtime using this code:
[C#.Net]
Steema.TeeChart.Axis bottomAxis = tChart1.Axes.Bottom;
bottomAxis.Automatic = false;
bottomAxis.Maximum = 36;
bottomAxis.Minimum = 5;

[VB.Net]
With TChart1.Axes.Bottom
.Automatic = False
.Maximum = 36
.Minimum = 5
End With
You may set Axis scale Maximum and Minimum to automatic individually. e.g:
[C#.Net]
Steema.TeeChart.Axis bottomAxis = tChart1.Axes.Bottom;
bottomAxis.AutomaticMaximum = true;
bottomAxis.AutomaticMinimum = false;
bottomAxis.Minimum = 5;

[VB.Net]
With TChart1.Axes.Bottom
.AutomaticMaximum = True
.AutomaticMinimum = False
.Minimum = 5
End With
Increment
You may tailor the intervals for the Axis. Select the Desired Increment combobox from the Scales section of the Axis page and add the increment you require. You may change this by code at runtime:
[C#.Net]
Steema.TeeChart.Axis bottomAxis = tChart1.Axes.Bottom;
bottomAxis.Increment = 20;

[VB.Net]
With TChart1.Axes.Bottom
.Increment = 20
End With
Datetime data
If your data is datetime (You may set the data to datetime for your Series by going to the Series, General page), the Chart->Axis page, scales section will show datetime range. Select the increment from the range shown in the Desired Increment combobox and add some sample data:
[C#.Net]
Random rnd = new Random();
DateTime today = DateTime.Today;
TimeSpan oneDay = TimeSpan.FromDays(1);
line1.XValues.DateTime = true;
for(int i = 1; i line1.Add(today,rnd.Next(100),Color.Red);
today += oneDay;


[VB.Net]
Dim i As Integer
Dim Today As DateTime = DateTime.Today
Dim OneDay As TimeSpan = TimeSpan.FromDays(1)
Line1.XValues.DateTime = True
For i = 1 To 25
Line1.Add(Today, Rnd() * 100, Color.Red)
Today = Today.Add(OneDay)
Next
Change the Increment at runtime:
[C#.Net]
Steema.TeeChart.Axis bottomAxis = tChart1.Axes.Bottom;
bottomAxis.Increment = Steema.TeeChart.Utils.GetDateTimeStep(Steema.TeeChart.DateTimeSteps.TwoDays);

[VB.Net]
With TChart1.Axes.Bottom
.Increment = Steema.TeeChart.Utils.GetDateTimeStep(Steema.TeeChart.DateTimeSteps.TwoDays)
End With
See the AxisLabels.ExactDateTime property for more information about date axis labelling.
Note
When changing axis label frequency, bear in mind that TeeChart will avoid label overlap according to the setting of the AxisLabels.Separation property. This means that if the label frequency is too high for the labels to fit, then TeeChart will allocate ‘best fit’. Changing the label angle and label separation are 2 options that may help you fit the labels you require. See the Labels section and AxisLabels.Angle property.
Titles
Titles are set in the Titles section of the Axis page. You may change the Title text for the Axis and its font and shadow properties. The angle and size of the Title text may also be specified. For runtime see the AxisTitle Class.
Labels
See the AxisLabels Class for a resume of Labels properties.
Note
When changing axis label frequency, bear in mind that TeeChart will avoid label overlap according to the setting of the AxisLabels.Separation property. This means that if the label frequency is too high for the labels to fit, then TeeChart will allocate ‘best fit’. Changing the label angle and label separation are 2 options that may help you fit the labels you require. See the AxisLabels.Angle property.
Label formats
You may apply all standard number and date formats to Axis labels. The Axis page, Labels section contains the field «Values format». If your data is datetime the field name changes to «Date time format». At runtime use:
[C#.Net]
tChart1.Axes.Bottom.Labels.ValueFormat = "#,##0.00;(#,##0.00)";

[VB.Net]
With TChart1.Axes.Bottom
.Labels.ValueFormat = "#,##0.00;(#,##0.00)"
End With
or for datetime data
[C#.Net]
tChart1.Axes.Bottom.Labels.DateTimeFormat = "dddd/MMMM/yyyy";

[VB.Net]
With TChart1.Axes.Bottom
.Labels.DateTimeFormat = "dddd/MMMM/yyyy"
End With
MultiLine labels
Axis labels can be displayed as multi-line text instead of a single line of text. Lines are separated using the LineSeparator character ().
[C#.Net]
bar1.Add(1234, "New" + Steema.TeeChart.Texts.LineSeparator + "Cars", Color.Red);
bar1.Add(2000, "Old" + Steema.TeeChart.Texts.LineSeparator + "Bicycles", Color.Red);
tChart1.Panel.MarginBottom = 10;

[VB.Net]
Bar1.Add(1234, "New" + Steema.TeeChart.Texts.LineSeparator + "Cars", Color.Red)
Bar1.Add(2000, "Old" + Steema.TeeChart.Texts.LineSeparator + "Bicycles", Color.Red)
TChart1.Panel.MarginBottom = 10
Example for DateTime labels:
The following will show the Bottom Axis labels in two lines of text, one showing the month and day, and the second line showing the year:
Feb-28 Mar-1 ..
2003 2003 ..
[C#.Net]
bar1.Add(DateTime.Parse("28/2/2003"), 100, Color.Red);
bar1.Add(DateTime.Parse("1/3/2003"), 200, Color.Red);
bar1.Add(DateTime.Parse("2/3/2003"), 150, Color.Red);
bar1.XValues.DateTime = true;
tChart1.Axes.Bottom.Labels.DateTimeFormat = "MM/dd hh:mm";
tChart1.Axes.Bottom.Labels.MultiLine = true;
tChart1.Panel.MarginBottom = 10;

[VB.Net]
Bar1.Add(DateValue("28/2/2003"), 100, Color.Red)
Bar1.Add(DateValue("1/3/2003"), 200, Color.Red)
Bar1.Add(DateValue("2/3/2003"), 150, Color.Red)
Bar1.XValues.DateTime = True
TChart1.Axes.Bottom.Labels.DateTimeFormat = "MM/dd hh:mm"
TChart1.Axes.Bottom.Labels.MultiLine = True
TChart1.Panel.MarginBottom = 10
Setting the AxisLabels.MultiLine property to True will automatically split labels in lines where there is a space, effectively dividing the Label into two:
‘mm/dd’ for the first line
‘hh:mm’ for the second line
At run-time you can always split the label into lines programmatically, using the OnGetAxisLabel event:
[C#.Net]
private void tChart1_GetAxisLabel(object sender, Steema.TeeChart.TChart.GetAxisLabelEventArgs e)

string myLabelText = e.LabelText;
tChart1.Axes.Bottom.Labels.SplitInLines(ref myLabelText, " ");
e.LabelText = myLabelText;


[VB.Net]
Private Sub TChart1_GetAxisLabel(ByVal sender As Object, ByVal e As Steema.TeeChart.TChart.GetAxisLabelEventArgs) Handles TChart1.GetAxisLabel
Dim myLabelText As String
myLabelText = e.LabelText
TChart1.Axes.Bottom.Labels.SplitInLines(myLabelText, " ")
e.LabelText = myLabelText
End Sub
In the example above, the global «TeeSplitInLines» procedure converts all spaces in «LabelText» to line separators (returns).
The axis AxisLabels.Angle property can also be used with multi-line axis labels.
Customising Axis labels
Further Label control may be obtained by using Axis events. The events permit you to activate/deactivate/change any individual Axis label. The following example modifies each Label, putting a textual phrase in front of the point index value:
[C#.Net]
private void button1_Click(object sender, System.EventArgs e)

bar1.FillSampleValues(20);
tChart1.Axes.Bottom.Labels.Style = AxisLabelStyle.Mark;


private void tChart1_GetAxisLabel(object sender, Steema.TeeChart.TChart.GetAxisLabelEventArgs e)

if(((Steema.TeeChart.Axis)sender).Equals(tChart1.Axes.Bottom))
e.LabelText = "Period " + Convert.ToString(e.ValueIndex);


[VB.Net]
Private Sub Button1_Click(ByVal sender As Object, ByVal e As System.EventArgs) Handles Button1.Click
Bar1.FillSampleValues(20)
TChart1.Axes.Bottom.Labels.Style = Steema.TeeChart.AxisLabelStyle.Mark
End Sub

Private Sub TChart1_GetAxisLabel(ByVal sender As Object, ByVal e As Steema.TeeChart.TChart.GetAxisLabelEventArgs) Handles TChart1.GetAxisLabel
If CType(sender, Steema.TeeChart.Axis) Is TChart1.Axes.Bottom Then
e.LabelText = "Period " & e.ValueIndex
End If
End Sub
See the section entitled Axis events for more information about customising labels with Axis events.
Logarithmic Labels
Normal Logarithmic labelling may be set in the following way:
[C#.Net]
private void button1_Click(object sender, System.EventArgs e)

Random rnd = new Random();
Steema.TeeChart.Axis leftAxis = tChart1.Axes.Left;
tChart1.Aspect.View3D = false;
bar1.Marks.Visible = false;
for(int i = 0; i bar1.Add(rnd.Next(100) * i);
leftAxis.LogarithmicBase = 10;
leftAxis.Logarithmic = true;
leftAxis.SetMinMax(0, 10000);
leftAxis.Labels.ValueFormat = "#e+0"; //exponential format


[VB.Net]
Private Sub Button1_Click(ByVal sender As Object, ByVal e As System.EventArgs) Handles Button1.Click
Dim i As Integer
TChart1.Aspect.View3D = False
Bar1.Marks.Visible = False
For i = 0 To 10000 Step 100
Bar1.Add(Rnd() * i)
Next
With TChart1.Axes.Left
.LogarithmicBase = 10
.Logarithmic = True
.SetMinMax(0, 10000)
.Labels.ValueFormat = "#e+0" ' exponential format
End With
End Sub
Labels will be set according to the Logarithmic base (default 10) thus, in this case giving labels at 1, 10, 100, 1000, 10000.
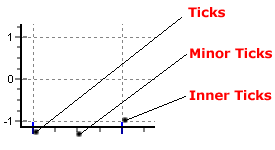
There are 3 tick types and 2 types of Grid. You may change the length, width and colour of each tick and Grid type. Changes can be made to Ticks, their associated Grid and Inner Ticks via the «Ticks» tab; changes to Minor Ticks and their associated Grid can be made via the «Minor» tab. New to TeeChart Pro version 5 is the ability to change the style of Ticks and Grids whose width is greater than 1 (default).
[C#.Net]
Steema.TeeChart.Axis bottomAxis = tChart1.Axes.Bottom;
bottomAxis.Ticks.Length = 7;
bottomAxis.Ticks.Color = Color.Green;
bottomAxis.MinorTickCount = 10;

[VB.Net]
With TChart1.Axes.Bottom
.Ticks.Length = 7
.Ticks.Color = Color.Green
.MinorTickCount = 10
End With
Axis position
Axes have a property to modify where each axis is to be located. In this example, the axis is moved 50% of the total Chart width, so it is shown at the chart center:
[C#.Net]
Steema.TeeChart.Axis bottomAxis = tChart1.Axes.Bottom;
bottomAxis.PositionUnits = PositionUnits.Percent;
bottomAxis. RelativePosition = 50

[VB.Net]
With TChart1.Axes.Bottom
.PositionUnits = PositionUnits.Percent
.RelativePosition = 50
End With
Additional Axes
Copying axes
TeeChart offers 5 axes to be associated with data Series: Left, Top, Bottom, Right and Depth. When you add a new series to a Chart you may define to which of the axes the Series should be related (Go to the Series tab, General page). You may repeat any one (or all) of the front 4 axes at any place on the Chart by using the Axis Customdraw method. Note that this method makes a copy of your Axis, it does not add a new Custom Axis. See the next section, Multiple Custom Axes, for more information.
Example:
[C#.Net]
private void Form1_Load(object sender, System.EventArgs e)

Random Rnd = new Random();
tChart1.Aspect.View3D = false;
tChart1.Panel.Gradient.Visible = true;
for(int t = 0; t line1.Add(t, ((Rnd.Next(100)) + 1) - ((Rnd.Next(70)) + 1), Color.Red);


private void line1_BeforeDrawValues(object sender, Steema.TeeChart.Drawing.Graphics3D g)

int posAxis = 0;
if(tChart1.Axes.Left.Maximum > 0)

tChart1.Axes.Left.Draw(g.ChartXCenter - 10,g.ChartXCenter - 20,g.ChartXCenter,true);
posAxis = tChart1.Axes.Left.CalcYPosValue(10);
tChart1.Axes.Bottom.Draw(posAxis + 10, posAxis + 40, posAxis, true);


[VB.Net]
Private Sub Form1_Load(ByVal sender As System.Object, ByVal e As System.EventArgs) Handles MyBase.Load
Dim t As Integer
TChart1.Aspect.View3D = False
TChart1.Panel.Gradient.Visible = True
For t = 0 To 20
Line1.Add(t, ((Rnd() * 100) + 1) - ((Rnd() * 70) + 1), Color.Red)
Next
End Sub

Private Sub Line1_BeforeDrawValues(ByVal sender As Object, ByVal g As Steema.TeeChart.Drawing.Graphics3D) Handles Line1.BeforeDrawValues
Dim posAxis As Integer
If TChart1.Axes.Left.Maximum > 0 Then
TChart1.Axes.Left.Draw(g.ChartXCenter - 10, g.ChartXCenter - 20, g.ChartXCenter, True)
posAxis = TChart1.Axes.Left.CalcYPosValue(10)
TChart1.Axes.Bottom.Draw(posAxis + 10, posAxis + 40, posAxis, True)
End If
End Sub
The example code above will produce the image below:
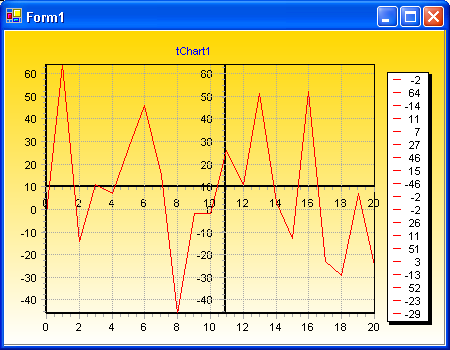
Custom axes
In this example, TeeChart will plot the New axes, one horizontal and one vertical in the centre of your Chart. When you scroll the Chart (dragging with right mouse button), the new vertical axis will always remain central to the Chart, the new horizontal axis will move up and down with vertical scrolling. The new axes are exact copies of the default axes.
Multiple Custom Axes
Together with the PositionPercent and stretching properties, it’s possible to have unlimited axes floating anywhere on the chart. Scroll, zoom, and axis hit-detection also apply to custom-created axes. Creating extra axes is now possible both at designtime via the TeeChart Editor and at runtime via a few lines of code:
Via the Chart Editor
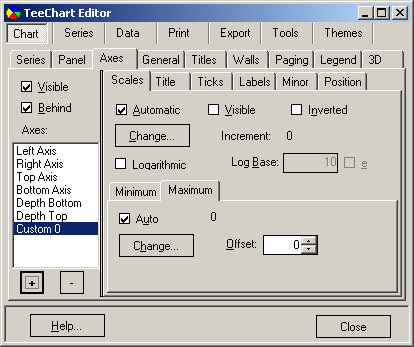
TeeChart offers you the ability to create custom axes at designtime enabling them to be saved in TeeChart’s tee file format. To achieve this, open the Chart Editor and click on the Axis tab and then select the «+» button to add a Custom Axis. Then select the Position tab making sure you have your new Custom Axis highlighted. The Horizontal checkbox on this page allows you to define your new Custom Axis as an horizontal axis or to leave it as the default vertical axis. The rest of this page and the other tabs in the Axis page can be used to change the Scales, Increment, Titles, Labels, Ticks, Minor Ticks and Position of the Custom Axis as explained above. To associate this new Custom Axis with the Data Series you desire select the Series tab and go to the General page where the dropdown Comboboxes ‘Horizontal Axis’ and ‘Vertical Axis’ will enable you to select your new Custom Axis depending on whether you previously defined it as vertical or horizontal.
Via Code
[C#.Net]
private void Form1_Load(object sender, System.EventArgs e)

Line line1 = new Line();
Line line2 = new Line();

tChart1.Aspect.View3D = false;
tChart1.Panel.Gradient.Visible = true;
tChart1.Header.Text = "TeeChart Multiple Axes";
tChart1.Series.Add(line1);
tChart1.Series.Add(line2);

for(int t = 0; t
line1.Add(Convert.ToDouble(t), Convert.ToDouble(10 + t), Color.Red);
if(t > 1)
line2.Add(Convert.ToDouble(t), Convert.ToDouble(t), Color.Green);


Axis leftAxis = tChart1.Axes.Left;

leftAxis.StartPosition = 0;
leftAxis.EndPosition = 50;
leftAxis.AxisPen.Color = Color.Red;
leftAxis.Title.Font.Color = Color.Red;
leftAxis.Title.Font.Bold = true;
leftAxis.Title.Text = "1st Left Axis";

// You are able to then position the new Axis in overall relation to the Chart
// by using the StartPosition and EndPosition properties.
//
// StartPosition=50
// EndPosition=100
//
// These figures are expressed as percentages of the Chart Rectangle with 0 (zero)
// (in the case of a vertical Axis) being Top. These properties can be applied to
// the Standard Axes to create completely partitioned 'SubCharts' within the Chart.

Axis axis1 = new Axis(false, false, tChart1.Chart);

tChart1.Axes.Custom.Add(axis1);

line2.CustomVertAxis = axis1;

axis1.StartPosition = 50;
axis1.EndPosition = 100;
axis1.AxisPen.Color = Color.Green;
axis1.Title.Font.Color = Color.Green;
axis1.Title.Font.Bold = true;
axis1.Title.Text = "Extra Axis";
axis1.PositionUnits= PositionUnits.Percent;
axis1.RelativePosition = 20;


[VB.Net]
Private Sub Form1_Load(ByVal sender As System.Object, ByVal e As System.EventArgs) Handles MyBase.Load
Dim Line1 As New Steema.TeeChart.Styles.Line()
Dim Line2 As New Steema.TeeChart.Styles.Line()
Dim t As Integer

TChart1.Aspect.View3D = False
TChart1.Panel.Gradient.Visible = True
TChart1.Header.Text = "TeeChart Multiple Axes"
TChart1.Series.Add(Line1)
TChart1.Series.Add(Line2)

For t = 0 To 10
Line1.Add(t, 10 + t, Color.Red)
If (t > 1) Then
Line2.Add(t, t, Color.Green)
End If
Next

With TChart1.Axes.Left
.StartPosition = 0
.EndPosition = 50
.AxisPen.Color = Color.Red
.Title.Font.Color = Color.Red
.Title.Font.Bold = True
.Title.Text = "1st Left Axis"
End With

'You are able to then position the new Axis in overall relation to the Chart
'by using the StartPosition and EndPosition properties.

' StartPosition = 50
' EndPosition = 100

'These figures are expressed as percentages of the Chart Rectangle with 0 (zero)
'(in the case of a vertical Axis) being Top. These properties can be applied to
'the Standard Axes to create completely partitioned 'SubCharts' within the Chart.

Dim Axis1 As New Steema.TeeChart.Axis(False, False, TChart1.Chart)

TChart1.Axes.Custom.Add(Axis1)

Line2.CustomVertAxis = Axis1

Axis1.StartPosition = 50
Axis1.EndPosition = 100
Axis1.AxisPen.Color = Color.Green
Axis1.Title.Font.Color = Color.Green
Axis1.Title.Font.Bold = True
Axis1.Title.Text = "Extra Axis"
Axis1.PositionUnits.= PositionUnits.Percent;
Axis1.RelativePosition = 20
End Sub
The above coded examples
. will show the following Chart:
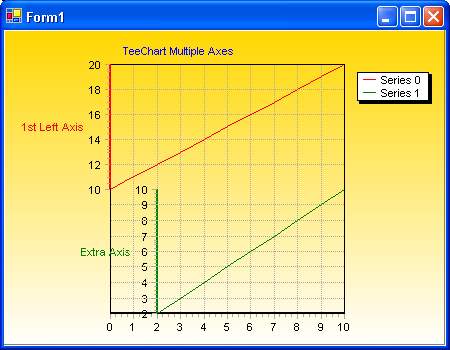
Multiple axes
Options are limitless! We advise caution when using Custom Axes as it is easy to start filling the screen with new axes and to lose track of which one you wish to manage !
Axis events
Axis events offer runtime flexibility to modify Axis Labels and present user interactivity on Axis Clicks.
OnClickAxis
See the OnClickAxis event.
[C#.Net]
private void tChart1_ClickAxis(object sender, System.Windows.Forms.MouseEventArgs e)

if(((Steema.TeeChart.Axis)sender).Equals(tChart1.Axes.Bottom))

MessageBox.Show("Clicked Bottom Axis at: " + line1.XScreenToValue(e.X));


[VB.Net]
Private Sub TChart1_ClickAxis(ByVal sender As Object, ByVal e As System.Windows.Forms.MouseEventArgs) Handles TChart1.ClickAxis
If CType(sender, Steema.TeeChart.Axis) Is TChart1.Axes.Bottom Then
MsgBox("Clicked Bottom Axis at: " & Line1.XScreenToValue(e.X))
End If
End Sub
OnGetAxisLabel
Can be used to modify Axis Labels. See the OnGetAxisLabel event.
[C#.Net]
private void button1_Click(object sender, System.EventArgs e)

bar1.FillSampleValues(20);
tChart1.Axes.Bottom.Labels.Style = AxisLabelStyle.Mark;


private void tChart1_GetAxisLabel(object sender, Steema.TeeChart.TChart.GetAxisLabelEventArgs e)

if(((Steema.TeeChart.Axis)sender).Equals(tChart1.Axes.Bottom))
e.LabelText = "Period " + Convert.ToString(e.ValueIndex);


[VB.Net]
Private Sub Button1_Click(ByVal sender As Object, ByVal e As System.EventArgs) Handles Button1.Click
Bar1.FillSampleValues(20)
TChart1.Axes.Bottom.Labels.Style = Steema.TeeChart.AxisLabelStyle.Mark
End Sub

Private Sub TChart1_GetAxisLabel(ByVal sender As Object, ByVal e As Steema.TeeChart.TChart.GetAxisLabelEventArgs) Handles TChart1.GetAxisLabel
If CType(sender, Steema.TeeChart.Axis) Is TChart1.Axes.Bottom Then
e.LabelText = "Period " & e.ValueIndex
End If
End Sub
OnGetNextAxisLabel
Can be used to decide which Axis Labels should be displayed. See the OnGetNextAxisLabel event. You should use the e.Stop Boolean property to include/exclude Axis Labels.
[C#.Net]
private void Form1_Load(object sender, System.EventArgs e)

line1.FillSampleValues(20);


private void tChart1_GetNextAxisLabel(object sender, Steema.TeeChart.TChart.GetNextAxisLabelEventArgs e)

if(((Steema.TeeChart.Axis)sender).Equals(tChart1.Axes.Bottom))

e.Stop = false;
switch(e.LabelIndex)

case 0: e.LabelValue = 5; break;
case 1: e.LabelValue = 13; break;
case 2: e.LabelValue = 19; break;
default: e.Stop = true; break;


[VB.Net]
Private Sub Form1_Load(ByVal sender As System.Object, ByVal e As System.EventArgs) Handles MyBase.Load
Line1.FillSampleValues(20)
End Sub

Private Sub TChart1_GetNextAxisLabel(ByVal sender As Object, ByVal e As Steema.TeeChart.TChart.GetNextAxisLabelEventArgs) Handles TChart1.GetNextAxisLabel
If CType(sender, Steema.TeeChart.Axis) Is TChart1.Axes.Bottom Then
e.Stop = False
Select Case e.LabelIndex
Case 0 : e.LabelValue = 5
Case 1 : e.LabelValue = 13
Case 2 : e.LabelValue = 19
Case Else : e.Stop = True
End Select
End If
End Sub

© 2002- Steema Software SL. All rights reserved.